How to Create High Dynamic Range Photos
 Our second Christmas guest writer, world famous photo-blogger David J. Nightingale from Chromasia, shares his top tips for creating great high dynamic range (HDR) photos.
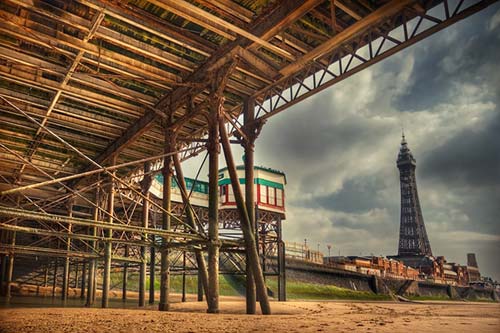
Before we begin our discussion of High Dynamic Range photography, take a look at the following photograph, bearing the following questions in mind:
1) Is it a good photograph?
2) Is it a well-exposed photograph?
3) Can it be ‘saved’ in Photoshop?
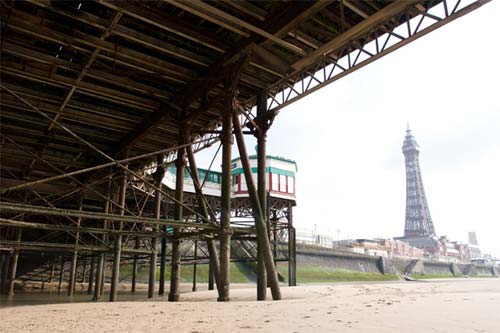
The answer to all three questions is a definite no – it just doesn’t work as a photograph: the exposure is terrible, and there’s very little we could do in Photoshop to improve it.
Now, take a moment to think through how you would advise the person who took this photograph: i.e. what would you tell them they need to do, or avoid doing in future? The first thing you would probably tell them is that they need to rethink the shot; i.e. there’s no way they can get a photograph that includes a bright sky and the shadow detail beneath this pier – it’s just not possible.
If you wanted to demonstrate this point you could take two further shots of this scene – one to capture the highlight detail in the sky, and another to capture the shadow detail beneath the pier. These would look something like the following two images:
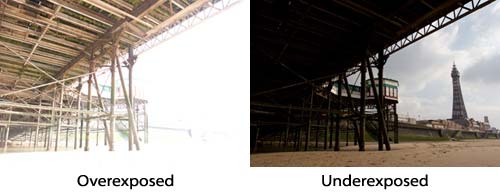
As you can see, the overexposed image, shot at 1/30th, contains detail in the shadow area of the scene, while the underexposed one, shot at 1/1000th of a second, correctly exposes the sky. By way of comparison, the original exposure we looked at above was shot at 1/250th; i.e. three stops below the overexposed image and two stops above the underexposed one.
What the above images demonstrate is that our cameras are limited; i.e. once the range in brightness within a scene becomes too large our cameras are unable to record it. Instead, we are forced to produce a poor photograph, with blocked shadow detail and clipped highlights, or we need to favour one extreme or the other – exposing for the highlights or the shadows.
Take a look at the following two images:
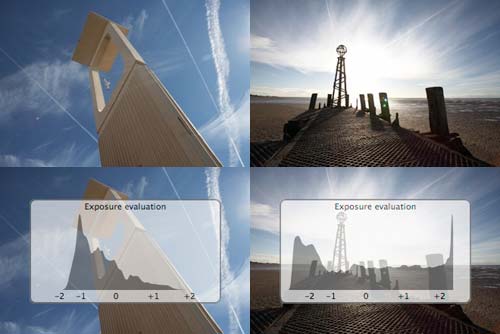
In the example on the left (above) the dynamic range of the original scene, as you can see from the ‘Exposure evaluation’ histogram (screen-grabbed from Capture One Pro), is around 4 EV (from -2 to +2 EV); i.e. there is no loss of either shadow or highlight detail. In the example on the right though, the dynamic range is much larger – around 9 EV. As you can see from the ‘Exposure evaluation’ histogram for this shot, there is some very minor clipping of the shadow detail but massive loss of data in the highlight areas of the image.
EV, short for Exposure Value, can be defined as the various combinations of camera shutter speed and relative aperture that give the same exposure. For example, 1/30th at f/8.0 is the same EV as 1/60th at f/5.6, and so on. So, if we have a scene with a dynamic range of between 5 and 6 EV our cameras can record detail in both the highlights and shadows areas of the scene. Beyond 6 EV and we must sacrifice details in one extreme or the other.
If we think back to our first example – the shot of the tower and the pier – we can calculate that we would need a camera with a dynamic range of 11 stops to capture the entire dynamic range of the scene (assuming that the native range of our camera is around 6 EV). This is because our overexposed image was +2 EV from the original exposure and the underexposed frame was shot at -3 EV.
So, what can we do when the dynamic range of a scene exceeds our camera’s ability to record it? We have three options. First, we can avoid taking the shot and either wait for better light, or use artificial lighting or (graduated) filters to decrease the dynamic range of the scene to fit within the dynamic range of our camera’s sensor.
Second, we can choose an optimum exposure to maximise detail in the area of the image we are interested in, thereby allowing either the shadows to block out, the highlights to blow, or both. With a scene that only marginally exceeds the dynamic range of our camera’s sensor, this isn’t a major problem – some black areas rather than shadow detail won’t ruin an image, nor will a few clipped highlights – but when the tonal of a scene far exceeds our camera’s ability to record it it’s unlikely, as we saw above, that we will be able to produce a decent photograph.
Third, and this is where we finally get to the point, we can employ a variety of techniques to convert the full tonal range of the original scene into a narrower one – one that conforms to the limitations of Photoshop, our printer, our monitors, and so on – i.e. techniques that will allow us to sidestep the limitations of our equipment and capture detail in both the shadow and highlight areas of an original scene with a dynamic range far in excess of the five, six or seven stops we can record with a single image.
So, where do we start?
Shooting for HDR
The first thing we need to do is to shoot a bracketed series of shots. The following sequence is a fairly typical example:
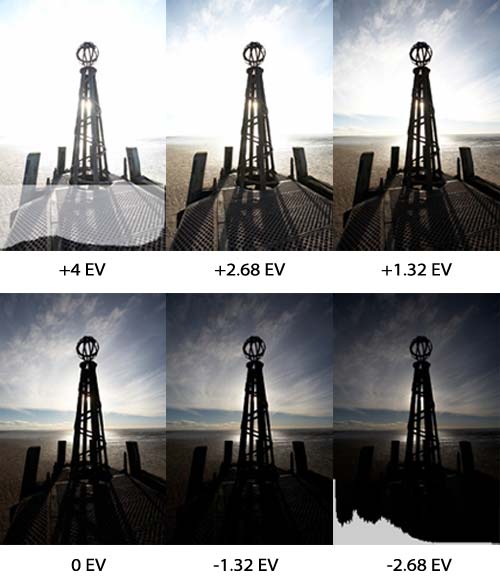
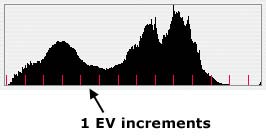
If you take a look at the histogram for the first image (superimposed over the top-left image) you will see that although almost the entire sky is blown, a full range of tones has been captured in the shadow areas of the image. Likewise, if you examine the histogram for the final image in the sequence, you will see that a considerable amount of the shadow detail has been lost but there are no blown highlights. The remainder of the images fill the gaps between these extremes which, in this instance, were spaced one and one-third stops apart. As you can see from the combined histogram below, the dynamic range of the original scene was 14 stops (or 14 EV) – well beyond the capabilities of anything other than dedicated high dynamic range imaging equipment.
If you’re not familiar with shooting bracketed sequences of images, here’s some guidelines:
Use a tripod - While a variety of the methods we will be discussing include an automatic method of aligning multiple exposures with one another, they aren’t always 100% reliable. If you shoot your original sequence using a tripod, taking care not to move the camera should you need to make any manual adjustments, your chances of creating a successful image will be much greater. If you have one, you should also use a remote release to further minimise the risk of moving the camera.
Number of exposures - For the best results, from either Photoshop or Photomatix Pro, you should shoot a minimum of three exposures. What you should also ensure is that you shoot enough images to cover the entire dynamic range of the scene; i.e. your darkest image should contain no blown highlights and your lightest should contain no blocked shadows. You should also see the note below regarding exposing for the shadow detail.
Often, three exposures will be enough, but if the original scene contains a wider dynamic range you will need to shoot more. The easiest way to evaluate the dynamic range of a scene is to use a spot meter to measure the EV of the brightest and darkest areas, and calculate your exposure sequence accordingly. If you don’t have a spot meter you can use your histogram to evaluate your exposures.
Exposure spacing - There is no hard and fast rule about how far apart you should space the individual exposures in a bracketed sequence, but the general consensus seems to be that you should use an increment of somewhere between one and two stops. Differences of less than one stop needlessly replicate data, while an increment of higher than two stops risks a loss of data.
Auto-bracketing - Most cameras allow you to shoot an automatic sequence of three bracketed exposures, though some high-end DSLRs allow you to extend this to seven or higher. If the dynamic range of the scene can be captured within three shots, providing the individual exposures aren’t spaced more than two stops apart, you should use this function rather than manually altering your camera’s settings. This will minimise the chance of misaligned images.
Manual bracketing - If you do need to change your camera’s setting manually make sure that you vary the exposure by altering the shutter speed or use your exposure compensation dial, but don’t vary the aperture. If you alter the latter you run the risk of the different exposures having a varying depth of field.
Shoot quickly - If the scene you are recording doesn’t contain any moving components then the speed at which you take your bracketed exposures doesn’t matter – assuming, of course, that the lighting doesn’t change during the sequence. If the scene contains rapidly moving components – people, birds, and so on – these cannot be recorded, at least not reliably. If, on the other hand, the scene contains slow moving components – clouds, for example – then the faster you shoot the more likely they are to be in much the same place throughout the sequence.
Exposing for the shadow detail
The two most important shots within a bracketed sequence, shot specifically for HDR, are the lightest and the darkest. The darkest shot is relatively straightforward – you just need to make sure that you haven’t blown the highlights – but the lightest shot is a bit trickier. This is the one that you use to capture the full range of shadow detail within your image, but you need to ensure that that the histogram for this image looks more like the one on the right rather than the left (below):

On the face of it, both histograms look fairly similar, and both demonstrate that there are no blocked shadows, but the one on the right indicates that the shot in question was about one stop brighter than the one on the left. Why is this important?
The reason for this is a technical one, relating to the nature of your camera’s sensor. A 12 bit RAW file is capable of recording 4,096 levels of brightness across a dynamic range of around five or six stops, but the amount of data allocated to each of the five stops isn’t equal: half are allocated to the first stop (which measures the brightest tones in an image), half of the remaining 2048 are allocated to the next stop, half of the remainder to the next, and so on.
This is illustrated by the table below:
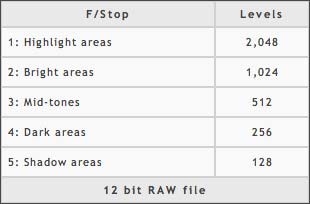
The reason that this is significant is because the last stop can only record 128 levels of brightness while the one above it can record twice as much data; i.e. 256 levels of brightness. With a normal photograph this difference isn’t especially significant; i.e. all the data falls within the shadows, and we don’t perceive that there is less data in these areas of the image. With an HDR image, especially one that is produced using Photomatix Pro, the shadow details become much more significant. Here, if we haven’t recorded sufficient levels of detail in these areas of our original bracketed sequence, the conversion process will struggle to produce a ‘clean’ image; i.e. there will be noise, banding, or other digital artefacts in the darker areas of our converted image. In short, make sure that you check the histogram of your lightest shot in the sequence to make sure that the leftmost edge of your histogram isn’t close to or touching the leftmost edge of the display.
So, having shot our initial series of bracketed exposures, bearing in mind the above guidelines, how do we get from a bracketed sequence of originals to the final HDR image?
A detailed explanation of how to convert your bracketed sequence of images into an HDR image is beyond the scope of this scope of this short article, but basically it involves two further steps.
The first of these involves generating a 32 bit image from your 8 bit or 16 bit originals. This can be done using Photoshop (or any of a variety of software tools designed for this purpose, e.g. FDRTools and Photomatix Pro). The creates a single, blended image, with a much larger dynamic range than any of the original sequence. In other words, it creates a single image that encompasses both the brightest highlights and the deepest shadows.
The problem with 32 bit images though is that they can’t be displayed on conventional monitors, nor can they be printed, so they need to be converted back into Low Dynamic Range (LDR) images. There are a variety of ways of doing this but the most useful technique is Tone Mapping.
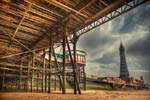
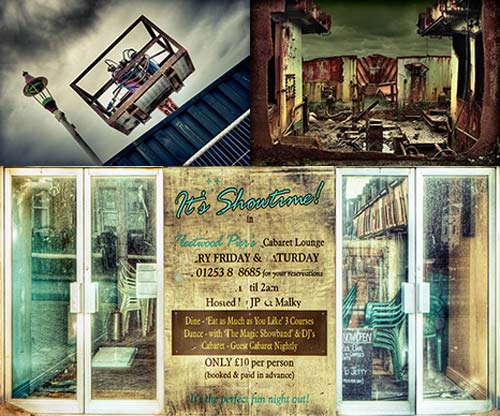
Tone Mapping is a process whereby the different areas of an original scene are evaluated then combined to produce a full range of tones in each area; i.e. there will be a broad range of tones in both the shadow and highlight areas of the original scene. If you take a look at the tone mapped version of the image I used to open this article (created using Photomatix Pro) you will see that the final image has a full range of tones in the shadow areas of the image (underneath the pier) and in the sky (the brightest area of the original scene).
As I mentioned earlier, there are a variety of tools you can use to create HDR images, each of which produces slightly different results. Photoshop, for example, is great for producing natural looking images from scenes with a very large dynamic range. FDRTools, on the other hand, produces more striking images than Photoshop but can be used to produce photo-realistic results, while Photomatix Pro can be used to produce a more surreal final image, as illustrated by my shot of pier.
Creating HDR images is a time-consuming process, and it’s often difficult to get really good results, but it is an interesting technique that can be used to produce images that are simply not possible by any other means.
Useful Resources
Our Photoshop and HDR tutorials – http://www.chromasia.com/tutorials/online/
Our HDR gallery – http://www.chromasia.com/galleries/hdr.php
Photomatix Pro – http://www.hdrsoft.com
FDRTools – http://www.fdrtools.com
All images in this article © David J. Nightingale
Loading comments…