Lensbaby
Review Date: 16th April 2004
Introduction
 The
Lensbaby is the brainchild of professional photographer Craig
Strong, who invented the Lensbabies Flexible Lens Mounting
System (to give it it's full name) in an effort to replace
his Holga film camera with a digital equivalent. It is described
on the Lensbaby website as "the hybrid love children
of an old-fashioned bellows camera and an up-tight tilt-shift
lens", producing photographs with " the same soft,
roughed-up look produced by a Holga". I've never used
a Holga before, so I didn't really know what to expect from
the Lensbaby, but I was anticipating trying out a new photographic
method that would produce unique results and actually be fun.
Just what I needed after a few weeks of struggling to take
any photographs at all, and potentially another good idea
for my recent "Beating
the Photography Blues" article. So does the Lensbaby
live up to its billing? Find out in my review.
The
Lensbaby is the brainchild of professional photographer Craig
Strong, who invented the Lensbabies Flexible Lens Mounting
System (to give it it's full name) in an effort to replace
his Holga film camera with a digital equivalent. It is described
on the Lensbaby website as "the hybrid love children
of an old-fashioned bellows camera and an up-tight tilt-shift
lens", producing photographs with " the same soft,
roughed-up look produced by a Holga". I've never used
a Holga before, so I didn't really know what to expect from
the Lensbaby, but I was anticipating trying out a new photographic
method that would produce unique results and actually be fun.
Just what I needed after a few weeks of struggling to take
any photographs at all, and potentially another good idea
for my recent "Beating
the Photography Blues" article. So does the Lensbaby
live up to its billing? Find out in my review.
Price
The Lensbaby currently costs $96 for either the Canon or Nikon version - that's only £53 at the current (favourable) US dollar to UK sterling exchange rate.
The Lensbaby is available in two mount types, for Nikon and Canon SLRS, and will fit the following camera models:
- The Nikon F-Mount fits all Nikon SLRs as well as:
Fujifilm S1 Pro & S2 Pro; and Kodak DCS 100, DCS 200, DCS 420, DCS 460, DCS 410, DCS 315, DCS 330, DCS 620, DCS 660, DCS 720x, DCS 760, DCS 760M, & DCS 14n. - The Canon EF Mount fits all Canon EOS SLR bodies as well
as:
Kodak DCS-1, DCS 520, & DCS 560.
Design
 |
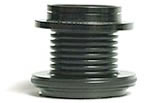
| Lensbaby with end cap and lens cap fitted |
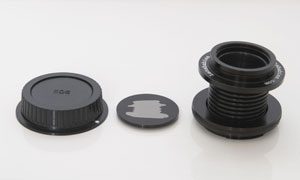 |
| Lensbaby with end cap and lens cap not fitted |
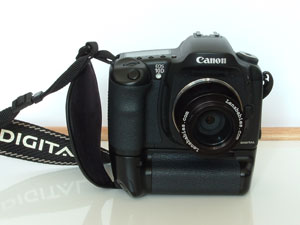 |
| Lensbaby mounted on Canon EOS 10D |
Features and Ease-of-Use
The Lensbaby has a basic, but clever, design that consists of a camera mount at one end, lens tubing in the middle, and an aperture ring and focusing collar at the other end.
The Lensbaby mounts on your camera in the same way as your other camera lenses. On the Canon fitting Lensbaby that I have reviewed, there is a small white mark on the mount, which you line up with the mark on your camera body and then turn clockwise to attach it. The Lensbaby is supplied with an end cap to protect the rear element when it is stored away, again just as with any other lens.
The lens tubing is the part of the lensbaby that allows you to control the effect that it gives. It can be compressed or extended by pulling or pushing the focusing collar at the end of the Lensbaby. This in turn controls what is in focus, with fully compressed focusing on infinity and full extended focusing about 1 foot ahead. To focus on subjects that are between these distances, you have to partly compress the Lensbaby.
Compressing and extending the lens tubing in a straight line will focus on anything that is in the middle of the scene. If you want to focus off-centre, the lens tubing can be bent in any direction, with the rule of thumb being to bend the Lensbaby towards the area of the picture that you want to have in focus. This is the a little trickier than just compressing and extending in a straight line, as you have to control both how much the Lensbaby is compressed and where it is pointing at the same time, and it's easy to overshoot and get everything out of focus. With a little bit of practice, though, you will soon feel in full control of focusing the Lensbaby.
As with any camera system, the aperture controls what is and isn't in focus. The Lensbaby is supplied with an aperture ring which gives a fairly wide-open aperture of f/5.6. If you completely remove it using the supplied removal tool, you get an aperture of f/2.8. You can also purchase additional aperture rings that give apertures of f/4 and f/8. An aperture of f/5.6 is described as the most versatile in the Lensbaby system, so you may be happy enough with the default aperture ring.
After about 1 hour of using the Lensbaby, I had figured out how the Lensbaby operates. The most difficult thing that I found from an ease-of-use point of view was having to manually focus. I'm one of those photographers who always use auto-focus whenever possible, so suddenly having to judge if something was in focus without having the camera to rely on came as something of a shock. So much so that this proved to be more of a problem than actually using the Lensbaby! I did find that the combination of the Lensbaby and manual focusing slowed the whole picture taking process down, which caused me to concentrate more on what I was doing.
The Lensbaby is also supplied with a small manual, an aperture ring removal tool and a very smart-looking, metal lens cap with the Lensbaby logo on the front. The general construction is very good, with everything except the bendy plastic lens tubing being constructed of metal. It's a simple design without too many moving parts, so it should prove to be durable.
Images
Here are a few sample images that I took during my time with the Lensbaby, using it with my Canon EOS 10D. They may not be the greatest photos in the world, but they do give an idea of what can be achieved with the Lensbaby:
 |
 |
 |
 |
 |
 |
 |
 |
Conclusion
![]()
(out of 5 stars)
The Lensbaby is obviously not something that you will use all the time, but it does give a unique perspective on the world that is a radical departure from the precision of digital photography. At a time when people seem to be obsessed with megapixels and resolution, it's very refreshing to use a product whose charm lies in creating an imprecise effect, which can't be replicated with imaging software simply because it is so imprecise. Being able to control what is in focus in your photographs from left to right as well as back to front opens up a whole new way of seeing the world, especially if you've never used a Holga or bellows camera before. The Lensbaby is small enough, cheap enough and useful enough to warrant a place in any photographer's camera bag.