Sony A350 Review
Review Date: June 18th 2008
Author: Mark Goldstein
Leave a comment about this Review
|
Introduction
Sony have aggressively attacked the DSLR market in 2008, introducing no less than three new models, with a full-frame, 24 megapixel professional camera also due out later this year. The Sony A350 sits bang in the middle of the range, above the entry-level A200 and A300, and below the prosumer A700. The A350 shares a lot in common with the base A200 model, with the principal differences being the addition of Live View, a tilting LCD screen, and a new 14 megapixel sensor. The Sony A350 retains the same anti-dust system, ISO range of 100-3200, anti-shake system that's built into the body, eye-start auto-focus system and Dynamic Range Optimiser of the cheaper A200. With a street price of just under �500 / $900 with an 18-70mm kit lens, the Sony A350 faces some stiff competition from the likes of the Canon EOS 450D / Rebel Xsi, Nikon D60, and Olympus E-520. On paper at least the A350 seems to have some notable advantages, but do they translate into real-world performance? Mark Goldstein found out...
Compare Prices
Support PhotographyBLOG: Buy the Sony A350 from one of our affiliate retailers:Ease of Use
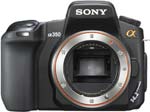
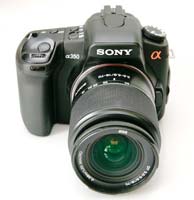
The Sony A350 is identical in many ways to the entry-level A200 in terms of its design, so a lot of the comments that we made in our review of that camera will be repeated here. The Sony A350 is slightly smaller and lighter than Sony's first DSLR, the A100, but it's still quite a big camera when compared to its main rivals, the Canon EOS 450D and Nikon D60. On its own the Sony A350 body weighs just under 600g and measures 130.8 x 98.5 x 74.7 mm, rather dwarfing the standard 18-70mm f/3.5-5.6 kit lens, which feels a little lightweight and out-of-place in this company. Build quality is very good, with a chunky plastic body that is well-suited to two-handed operation, unlike some of the more diminutive DSLRs that we've seen recently. The A350's design is dominated by the very deep, chunky rubberised handgrip, and the large, tilting 2.7 inch LCD screen on the rear. There is a pronounced curve/indentation to the back of the body, allowing a comfortable resting position for the thumb when gripping the camera, while the indentations on the rubberized front of the grip � which houses both card (at the side) and chunky info lithium NP-FM55H battery (at the base) � means that it won't easily slip from your grasp in the heat of the action.
The Sony A350 is quite complex in terms of the number of external controls that it has, with over 20 in total. The majority of the controls are clearly labeled and common to most cameras. There's a mode dial on the top-left of the camera that lets you quickly select the various shooting and scene modes. Also found on top of the camera are the Drive continuous shooting/bracketing button, very handy ISO button, and the shutter button, which is quite loud compared with other DSLRs and may deter some from using it for candids, but at least its definitive sound confirms for the less experienced user that the shot has actually been taken. New for the A350 is the prominent Live View/OVF switch, which as you would expect allows you to quickly change between composing in Live View mode or using the traditional optical viewfinder. When other manufacturers, notably Canon on the EOS 450D / Rebel Xsi, have buried their live view mode deep within the menu system, its very refreshing to see Sony making it so accessible on the A350.
Live View is the Sony's A350's trump card, the principal reason why you'd buy this camera instead of one of its main rivals, and by and large it's very well-implemented. The majority of Live View systems have to raise and lower the camera's shutter in order to autofocus and then show a live video feed from the image sensor on the LCD screen. You can see exactly what the camera will capture, but it also produces a noticeable and audible delay, making this type of system invariably slow and best-suited to static subjects. A few models additionally offer a contrast-AF system taken directly from compact digicams, but as on the Canon EOS 450D / Rebel Xsi, they're annoyingly slow in operation.
The A350 takes a completely different approach, adding a smaller secondary sensor above the optical viewfinder and using a small mirror to direct light either to the secondary sensor for the Live View feed or through the optical viewfinder. The Olympus E-330 DSLR used a similar technique a few years ago, albeit with a much dimmer viewfinder that drew considerable criticism and poor sales. The Sony A350 additionally closes the viewfinder via a mechanical shutter when Live View is activated to prevent stray light from entering. Crucially, the A350's clever technical implementation means that it can use the same phase-change AF system for both Live View and the optical viewfinder, which in laymen's terms means that there's no difference between the two in terms of autofocusing speed. In addition, the exact same markings are shown, so what you see in the optical viewfinder you also see on the LCD screen in Live View mode, but with Live View you can press the Display button to show more settings and even a histogram, plus preview the effects of white balance and exposure changes.
It all sounds great so far, but there there are a couple of notable downsides to the Sony A350's implementation. The use of the secondary sensor means that only 90% scene coverage is achieved via Live View, compared with 95% through the optical viewfinder and the 100% that most other DSLR's Live View systems can show. It's also more difficult to manually focus because you can't use the LCD screen to zoom right in, and the magnification of the optical viewfinder is a relatively poor 0.74x because of the secondary sensor's position above it. So if you require complete scene coverage, accurate manual focus and a bigger viewfinder, there are better Live View systems around. For everyone else, the A350's system is simply much faster and intuitive to use, especially in tandem with the tilting LCD screen, and will particularly appeal to people who are upgrading from a compact camera to a DSLR.
 |
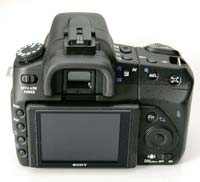 |
| Front | Rear |
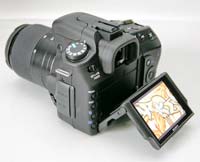
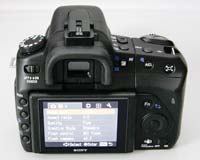
The Clear Photo LCD screen is a large 2.7 inch model with an adequate resolution of 230,000 pixels, a fairly wide viewing angle and visibility that isn't compromised by bright sun. Unlike the A200's fixed LCD screen on which it's based, the A350's screen can be pulled out from the back of the camera on one hinge and then tilted upwards on another. This tilting arrangement is a logical feature given the presence of Live View, allowing you to hold the camera above your head or at waist level and still be able to clearly see what you're shooting. The A350's system isn't as versatile as the Panasonic L10, which has an LCD that can also be rotated from left to right, but it's still great fun to use and a notable advantage over all the other DSLRs in its price-bracket.
Inset above the LCD is the new optical penta-mirror viewfinder, surrounded by a spongy rubber eyepiece and with a small dioptric adjustment control ranged top right. One of the downsides of the Sony A350's Live View mode is that the viewfinder provides less magnification than both the A200 - 0.74x versus 0.83x - and the Canon EOS 450D / Rebel Xsi - 0.74x versus 0.87x - resulting in a slightly smaller, dimmer view. If you intend to compose the majority of your images using the OVF, then there are DSLRs around that are better-specced, but I think that the versatility and sheer fun of the A350's Live View mode is worth the sacrifice. The viewfinder displays standard shooting information along the bottom, with a central grid that illuminates in red which of the 9 point AF areas are being utilized. Beneath the viewfinder is a sensor that pre-focuses a shot as you bring your eye up to it (called Eye Start AF); a real boon for the happy snapper brigade, although you can turn this off if you don't get on with it. The new 9 point autofocus system, using technology borrowed from the prosumer A700 model, is noticeably faster and more accurate than the A100. The AF/MF button on the front of the camera lets you switch between auto and manual focusing.
Due to the large 14 megapixel images, the A350 can only shoot in continuous mode at a fairly pedestrian 2.5 frames per second when using the OVF, and just 2 fps in Live View mode. The number of continuous sequential shots possible is limited only by the available memory when shooting Standard or Fine JPEG, but when using RAW mode the A350 can only maintain the 2.5fps rate for up to 4 images. The Drive button also allows exposure bracketing of +/- 0.3EV or +/- 0.7EV, shooting three images with a single press of the shutter. It also takes three bracketed images for white balance. Notable by its absence is any kind of LCD panel on top of the camera to show what the current settings are, which is always useful. Instead you have to rely on the information displayed in the optical viewfinder or the more comprehensive information shown by default on the LCD screen. The pop-up flash housing opens automatically if you're shooting in Auto or one of the scene modes and a flash mode is selected, but not in any of the more creative modes such as shutter- or aperture-priority. There's also an external flashgun hotshoe which includes a slip off plastic cover.
Logically placed to the left of the optical viewfinder on the camera back is the Off/On switch. Flick it to on with your eye already to the viewfinder and you're ready to take the first shot in less than a second. Arranged in a vertical row immediately below are four buttons for bringing up the camera's menu folders on screen; activating, switching off or changing the view of the display settings; the last two being the self explanatory trash can and playback buttons. On the opposite side of the main LCD screen is a responsive four-way control pad for tabbing through and affecting change to settings or images. Above the navigation pad to the right of the viewfinder are the Exposure Compensation and Auto-Exposure Lock buttons, the latter locking the exposure in capture mode. The Smart Teleconverter button on the far-right is new to the A350, but I doubt you'll use it too often. It acts as a digital zoom during Live View mode, magnifying the image by 1.4 and 2.0 x and delivering a 7.7 and 3.5 megapixel image respectively.
 |
 |
| Tilting LCD Screen | Rear Controls |
Just below is the Function button, which provides quick access to most of the principal creative controls via the LCD screen. Press it once and the screen switches to Quick Navigation mode, allowing you to use the pad to move around and change the various settings shown on the LCD (Flash Mode, Metering Mode, Autofocus Mode, AF Area, White Balance and D-Range Optimiser). Although not as refined as the A700, it's still an excellent system that works really well, almost making up for the lack of a top LCD information screen. You can still access all of these options from the main menu system or a dedicated button too. The Function button also doubles up as the button that rotates captured landscapes to portrait ratio and vice versa. Tilt the camera on its side and the shooting info on the LCD automatically rotates through 90� with you.
The main camera menu system on the Sony A350 is accessed by pressing the Menu button on the rear of the camera. As expected from a Sony digital camera, these are cleanly and logically structured. There are four main menus, Camera, Custom, Play and Setup. All of the camera's main options, such as white balance, image quality, auto-focus mode and ISO speed, can be accessed here, so the Camera menu has 11 options spread over 2 screens, the Custom menu has 6 options, the Play menu 9 and the Setup menu 14. Due to the large LCD screen and restricting the number of on-screen choices to 6, the various options and icons are clear and legible. If you have never used a digital camera before, or you're upgrading from a more basic model, reading the easy-to-follow manual before you start is a good idea. Thankfully Sony have chosen to supply it in printed format, rather than as a PDF on a CD, so you can also carry it with you.
If the A350 is set to Manual shooting mode, the control dial near the shutter button controls the shutter speed, with aperture set by holding down the exposure compensation button and then using the same control dial. In aperture- and shutter-priority modes, the front dial can be used to set the aperture and shutter speed respectively. Completing the rear controls is the large Super SteadyShot on/off switch, located below the navigation pad, which like the main power switch requires a reassuringly firm flick of the thumb, meaning that accidental activation or deactivation isn't a problem.
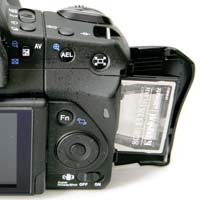
On the left-hand side of the A350's body sits a large rubber flap, covering a port for a remote release cable, and a DC-in port for a mains power adaptor. Unlike the more expensive A700 model, there is no HDMI functionality on this camera. On the right side is the CompactFlash slot. As this is a DSLR, no memory card is included with the camera itself. For the purposes of my review, I was shooting to an 8GB compact flash card with a mixture of RAW, simultaneous RAW+JPEG and, for sample images, the Fine JPEG mode. Pleasingly, write speeds for the different file formats appear nigh on instantaneous, meaning that in single shot mode you're not conscious of the camera processing the first image before you can take the second.
Finally, moving to the bottom of the camera, we find the metal tripod socket, ideally positioned in-line with the middle of the lens mount, and the battery compartment. The Sony A350 uses an InfoLITHIUM rechargeable battery pack, which delivers up to 730 shots between charges using the optical viewfinder or around 400 using Live View. It can also display the remaining battery life on the LCD screen as a percentage, so that you always know how much power is left.
 |
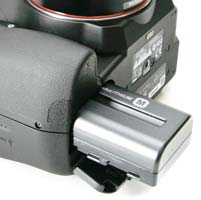 |
| Memory Card Slot | Battery Compartment |
As with the older A100 and its successor the A200, the Sony A350 has inherited a number of core Konica Minolta technologies. In addition to the Minolta A-type lens mount that boasts day one compatibility with 29 years worth of existing lenses, Sony's Super SteadyShot anti-shake technology is built into the camera body itself rather than the lens, adjusting for external hand-shake by counter-moving the CCD in a compensating manner. I found during the review period that the Super SteadyShot system is very effective, resulting in more usable shots in low light conditions without flash than I would have thought possible, and giving the 2.5 shutter speed steps advantage that the marketing literature promises. Sony's system also offers quite a large advantage over the likes of Nikon and Canon, in that because it's built-into the camera body, it works with any lens that you attach to the camera, removing the need to buy more expensive lenses with anti-shake.
The Sony A350 is equipped with a dual anti-dust system that protects the CCD image sensor from unwanted dust particles, which can find their way in when changing lenses or zooming in and out. At the point of the camera powering down, the A350's sensor automatically vibrates to shake off any dust that is present on the sensor. As a further line of defence, the 14 megapixel CCD sensor's filter sports an anti-static coating. In the short term the anti-dust combo appears to work well, with a few very small particles of dust only visible at very small apertures. In spite of this Anti-Dust Technology, you'll still need to invest in some kind of third-party sensor cleaning solution to keep the image sensor completely free of unwanted dust, but it does keep the majority at bay.
Sony's D-Range (Dynamic Range) Optimiser adjusts brightness or contrast across the whole scene and is claimed to be particularly effective for high contrast, backlit scenes. When shooting in either JPEG or RAW, the Standard mode improves shadow detail using standard gamma curves, with the Advanced mode providing a more exaggerated effect. Take a look at the Image Quality page for some examples of the three DRO settings.
Once you have captured a photo, the Sony A350 has a fairly good range of options when it comes to playing, reviewing and managing your images. You can instantly scroll through the images that you have taken, view thumbnails, zoom in and out up to 12x magnification, view slideshows, delete, protect, rotate an image and set the print order. The Display button toggles between no information, a simple settings information screen, a Histogram screen showing a combination of brightness and RGB histograms plus small image and key camera settings, and five small thumbnails above the main image.
In summary the Sony A350 builds on the proven design of the A200 by adding a few key features that really make a difference, particularly appealing to the compact camera user who wants to upgrade to a DSLR, but doesn't want too much of a steep learning curve.
|
![]() PhotographyBLOG
is a member of the DIWA
organisation. Our test results for the Sony A350 have been submitted to DIWA
for comparison with test results for different samples of
the same camera model supplied by other DIWA
member sites.
PhotographyBLOG
is a member of the DIWA
organisation. Our test results for the Sony A350 have been submitted to DIWA
for comparison with test results for different samples of
the same camera model supplied by other DIWA
member sites.