Sony A700 Review
Review Date: January 17th 2008
Author: Mark Goldstein
Leave a comment about this Review
|
Image Quality
All of the sample images in this Review were taken using the 12 megapixel Extra Fine JPEG setting, which gives an average image size of around 9Mb.
Noise
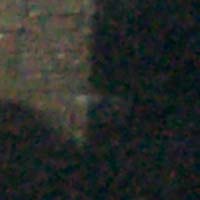
There are 7 main ISO settings available on the Sony A700 which you can select at any time if the camera is in the creative shooting modes. There is virtually no discernible noise at the slowest settings of ISO 100, 200 and 400. Noise is starting to appear at ISO 800, bit it is still well controlled even at ISO 1600. As you might expect, a lot of detail is lost at the fastest speeds of ISO 3200 and especially 6400, with the images having a "painted" feel, but they are still perfectly useable for small print sizes. Here are some 100% crops which show the noise levels for each ISO setting:
ISO 100 (100% Crop) |
ISO 200 (100% Crop) |
 |
 |
ISO 400 (100% Crop) |
ISO 800 (100% Crop) |
 |
 |
ISO 1600 (100% Crop) |
ISO 3200 (100% Crop) |
 |
 |
ISO 6400 (100% Crop) |
|
 |
Sharpening
Here are two 100% crops which have been Saved as Web - Quality 50 in Photoshop. The right-hand image has had some sharpening applied in Photoshop. The out-of-the camera images are quite soft using the creative style of Standard with its default setting of 0 sharpening. You can change the in-camera sharpening level for any creative style if you don't like the default look.
Original
(100% Crop) |
Sharpened (100% Crop) |
 |
 |
 |
 |
Chromatic Aberrations
The Sony A700's 18-70mm (27-105mm equivalent) kit lens handled chromatic aberrations well during the review, with small levels of purple fringing mainly present around the edges of objects in high-contrast situations at the edges of the image, as shown in the example below.
Example
1 (100% Crop) |
Example
2 (100% Crop) |
 |
 |
RAW Format
The Sony A700 enables users to capture RAW and JPEG format files. RAW files can be saved in the .ARW format. We've provided a few samples for you to download.
Download
Example #1
Download
Example #2
Download
Example #3
Download
Example #4
Download
Example #5
Download
Example #6
Flash
The flash settings on the Sony A700 are Autoflash, Fill-flash, Rear flash sync. and Wireless. Red-eye Reduction is also available in the main menu. These shots of a white coloured wall were taken at a distance of 1.5m.
Flash Off - Wide Angle (27mm) |
Auto Flash - Wide Angle (27mm) |
 |
 |
Flash Off - Telephoto (105mm) |
Auto Flash - Telephoto (105mm) |
 |
 |
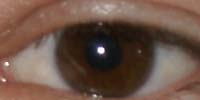
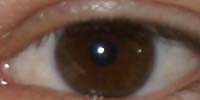
And here are some portrait shots. The Fill-flash setting caused a tiny amount of red-eye, which the Red-eye reduction mode successfully removed.
Fill-flash |
Fill-flash (100% Crop) |
 |
 |
Fill-flash & Red-eye reduction |
Fill-flash & Red-eye reduction (100% Crop) |
 |
 |
Night Shot
The Sony A700's maximum shutter speed is 30 seconds and there's also a Bulb mode for exposures up to 30 minutes long, which is excellent news if you're seriously interested in night photography. The shot below was taken using a shutter speed of 20 seconds, aperture of f/8 at ISO 100. I've included a 100% crop of the image to show what the quality is like.
Night Shot |
Night Shot (100% Crop) |
 |
 |
Anti Shake
The Sony A700 has an anti-shake mechanism, which allows you to take sharp photos at slower shutter speeds than other digital cameras. To test this, I took 2 handheld shots of the same subject with the same settings. The first shot was taken with anti-shake turned off, the second with it turned on. Here is a 100% crop of the image to show the results. As you can see, with anti-shake turned on, the images are much sharper than with anti-shake turned off. This feature really does seem to make a difference and could mean capturing a successful, sharp shot or missing the opportunity altogether.
| Shutter Speed / Focal Length | Anti-Shake Off (100% Crop) |
Anti-Shake On (100% Crop) |
| 1/4th sec / 105mm |  |
 |
| 1/20th sec / 105mm |  |
 |
Dynamic Range Optimizer
Sony's D-Range (Dynamic Range) Optimiser adjusts brightness or contrast across the whole scene and is claimed to be particularly effective for high contrast, backlit scenes. When shooting in either JPEG or RAW, the Standard mode improves shadow detail using standard gamma curves. Advanced mode allows you to select one of five correction levels or set the camera to Auto. You can also bracket three shots at different DRO levels with a single shutter press.
Off (100% Crop) |
Standard (100% Crop) |
 |
 |
Advanced Auto (100% Crop) |
Advanced: Level 1 (100% Crop) |
 |
 |
Advanced: Level 2 (100% Crop) |
Advanced: Level 2 (100% Crop) |
 |
 |
Advanced: Level 4 (100% Crop) |
Advanced: Level 5 (100% Crop) |
 |
 |
Overall Image Quality
The Sony A700 produced images of excellent quality during the review period. The 12 megapixel images are soft straight out of the camera using the default creative style and ideally require some further sharpening in an application like Adobe Photoshop, or you can change the in-camera sharpening to one of six different levels. The Sony A700 handled chromatic aberrations well, with limited purple fringing effects appearing only in high contrast situations. The built-in flash worked very well indoors with no red-eye and good overall exposure. The night photograph was excellent, with the maximum shutter speed of 30 seconds and the Bulb mode offering lots of scope for creative night photography. The Sony A700's first impressive feature in terms of image quality, especially given the 12 megapixel sensor, is the extensive and very usable ISO range of 100-6400. ISO 100-800 is virtually noise-free, whilst ISO 1600 produces acceptable results, and even ISO 3200 and 6400 are OK for small print sizes. The second one is the very effective Dynamic Range Optimizer function, which offers a wealth of options to get the most from the shadow and highlight areas in an image, without introducing any unwanted noise or other artifacts. Overall then a great performance - just make sure that you either increase the in-camera sharpening level for JPEGs, or you're happy to post-process the images in Photoshop later.
|
![]() PhotographyBLOG
is a member of the DIWA
organisation. Our test results for the Sony A700 have been submitted to DIWA
for comparison with test results for different samples of
the same camera model supplied by other DIWA
member sites.
PhotographyBLOG
is a member of the DIWA
organisation. Our test results for the Sony A700 have been submitted to DIWA
for comparison with test results for different samples of
the same camera model supplied by other DIWA
member sites.