Olympus SP-550 UZ Review
Review Date: April 30th 2007
Author: Gavin Stoker
Leave a comment about this Review
|
Introduction
Compare Prices
Support PhotographyBLOG: Buy the Olympus SP-550 UZ from one of our affiliate retailers:Ease of Use
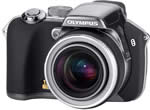
While it's been happily pumping out new DSLRs of late, Olympus hasn't forgotten the enthusiast compact market with its latest headline making SP-550 UZ bridge model. With a 28-504mm equivalent lens, it is, at the time of writing something of a world's first, the very definition of super zoom � or, as Olympus would prefer, 'ultra zoom'. It would perhaps suggest itself as a more portable back up camera for those already owning an E-400, if it weren't almost exactly the same size.
While such a long zoom will be more susceptible than most to the unfortunate effects of hand wobble and camera shake, Olympus hopes to counter that here with what it is calling Dual Image Stabilisation; basically a combination of high ISO speeds and anti shake of the mechanical, gyro-operated kind. Additionally offered to help freeze the action is a phenomenal 15 frames-per-second burst rate, though the trade off is that such images are captured at a lowly 1.2 megapixels.
The chief talking point of that 18x optical range aside, the 7.1 megapixel SP-550 UZ's build is mainly plastic with some nice metal detailing and a spongy rubberized front to provide useful extra grip when taking those extreme telephoto shots. There's even a spongy ring around the stub of the lens barrel to provide additional purchase. Despite these practicalities, looks wise the camera is both attractive and sophisticated with a metallic finish gun-metal grey chassis cannily disguising its plastic parts. With the four bog-standard AA batteries that power it inserted, plus the ever-optional removable media card � here once again for Olympus, the singular xD-Picture Card � the SP-550 UZ feels reasonably weighty in the palm, while light enough for one handed operation if pushed (though not sensible at the telephoto end).
Atop the camera you get the familiar sight of a shooting mode wheel, nestling alongside the main shutter button, itself handily encircled by the zoom lever to allow for rapid adjustments. Sitting to the right of this is a dedicated anti-shake (image stabilizer) button with familiar shaky hand icon (although here it looks more like it's waving), behind which is a slightly recessed power button, out of harm's way to avoid accidental activation/deactivation. Around the mode dial are ranged settings for full auto stills capture, program mode, aperture priority, shutter priority, manual, My Mode (for custom choices), Guide (a helpful built-in shooting manual for beginners), pre-optimised scene modes, video capture, plus image playback.
 |
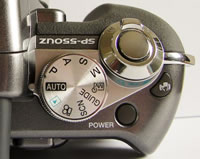 |
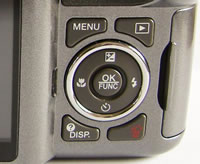
| Rear Controls | Top Controls |
If viewing the camera from the rear, to the left of this juts the eyepiece for the electronic viewfinder, which, though reasonably clear, can't quite for me avoid the temptation to use the larger LCD as a viewfinder instead. Forward of this sits the compartment for the pop up flash, which boasts a nicely firm spring action, plus a button alongside for its manual activation. Finally, ranged alongside the viewfinder is a small diopter adjustment wheel to aid visibility for the myopic; so far, so familiar. The back of the camera is largely given over to the 2.5-inch, 230k pixel LCD monitor, ranged to the left so it sits immediately below the viewfinder eyepiece, meaning your nose is regularly squashed up against it. To the left of the screen is a plastic covered slot for mains power, A/V out and USB connectivity. Top right of the screen is a button for quickly swapping the display between LCD and viewfinder, while bottom right of the monitor is a four-way controller encircling a central OK/function button.
As well as allowing you to tab through screen menus or captured images, the edges of the controller are given over to different uses in capture modes, with accessible settings for macro, self timer, adjusting flash options and exposure (+/- 2EV), though the latter isn't selectable in full auto mode. Top right of the four-way dial is a playback button � allowing a quick check of captured shots without leaving your shooting mode of choice � next to which is the self-explanatory menu button. Below is a further pair of controls: one for turning the display on/off (and also displaying image file info and a histogram in review mode) and the other for deleting duff images on the fly.
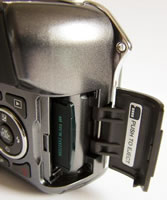
Moving to the base of the camera, there's the discovery of a sliding door and catch that protects the battery compartment, next to which is a screw thread for a tripod, and a speaker. Next, on the right hand side of the camera, as viewed from the back, is a flap that covers a slot for that optional xD-Picture Card. Lastly on the front of the camera, aside from that gargantuan lens there is a self-timer lamp window.
The camera is not the quickest to power up � taking a fairly leisurely three seconds or so to switch on the LCD and for the lens itself to adjust to maximum wide-angle setting. Moving from that setting to extreme telephoto is a similarly relaxed affair, though the transition is commendably smooth. Taking a moment or two to determine accurate focus, there's no noticeable shutter delay as you go on to take the shot, while an indicator light alongside the monitor blinks red as the picture is committed to memory � a two or three second process at maximum JPEG setting. This duration inevitably doubles if attempting a shot in RAW instead.
 |
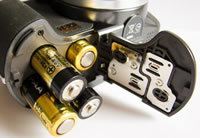 |
| Memory Card Slot | Battery Compartment |
Turning on the LCD in auto capture mode, the screen automatically displays a range of settings as its default � the standards of a battery life indicator, number of shots remaining, resolution and image quality selected, the shooting mode itself, and a pair of bars indicating the central focus area. If wished you can delve into the screen menus and activate the display of a live histogram. These indicators are mirrored in the subsequent modes, with the addition of shutter speeds and aperture settings, plus selected ISO. Flicking the dial around to scene mode brings up a selection of 23 pre-set options for common subjects and shooting conditions; ranging from portraits through fireworks, natural light � the sort of selection you'd find on one of the more streamlined Mju compacts in fact � and no less than three underwater modes. You get a photo illustrating each, and with a further press of the display button, a short written explanation (such as 'requires underwater housing'!), which keeps things beginner friendly.
Back in auto mode a press of the 'menu' button brings up a desktop-like display with various icons indicating differing sub-menus. The most basic display includes image quality, set up, silent mode or reset options � of which set up is obviously the most involved, yet in full auto the most rudimentary. Here you can format the memory, switch the sound on/off, adjust LCD brightness, call up the histogram or frame assist. Turn the mode dial to program, or any of the creative modes thereafter, and things get a little more interesting. Here a press of menu additionally provides access to a camera menu, comprising five sub folders. In the first you get the opportunity to adjust white balance, ISO (from ISO50 up to an incredible � and arguably unusable � ISO5000, though it would have been nice to see a dedicated button for light sensitivity), drive and metering modes. The second folder gives access to focus options, while the third allows the activation/deactivation of theSP-550 UZ's AF illuminator and/or image stabilizer. The fourth sub-folder affords the tweaking of contrast and sharpness, while the fifth adds the chance to boost or reduce saturation � and perhaps most importantly on this model, given the broad ISO range � turn its noise reduction filter on/off (the default setting is on).
In playback mode you get the chance to edit raw data, fix red eye, turn images to black and white or sepia and the ilk, plus activate a slideshow, erase one or all shots, earmark images for print and the standard features you'd expect. While navigating the menus is a cinch and the camera is reasonably quick to respond to changes, the Olympus SP-550 UZ's operation isn't the fastest we've seen, and feels a little clunky in comparison with either the latest generation compacts or DSLRs. Still, it's a case of horses for courses, as that zoom range remains its biggest selling point. But what of the images themselves � any good? Read on and find out�
|
![]() PhotographyBLOG
is a member of the DIWA
organisation. Our test results for the Olympus SP-550 UZ have been submitted to DIWA
for comparison with test results for different samples of
the same camera model supplied by other DIWA
member sites.
PhotographyBLOG
is a member of the DIWA
organisation. Our test results for the Olympus SP-550 UZ have been submitted to DIWA
for comparison with test results for different samples of
the same camera model supplied by other DIWA
member sites.