Panasonic Lumix DMC-L1 Review
Review Date: March 20th 2007
Author: Gavin Stoker
Leave a comment about this Review
|
Introduction
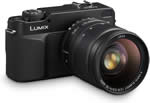
The Panasonic Lumix DMC-L1 is the first foray by Panasonic into the digital SLR market, and the Japanese consumer electronics giant has certainly taken an interesting approach. Instead of starting off slowly with an entry-level, beginner's camera, Panasonic has attempted to make its long-term intentions clear by launching a much more serious and distinctive camera. With a background in electronics, it made sense for Panasonic to ally itself with two photographic veterans, and the DMC-L1 features Leica technology for the optical system, and is based on the Four Thirds sensor standard as championed primarily by Olympus. The DMC-L1 has a traditional rangefinder style quite unlike most other DSLR camera and also features Panasonic's Optical Image Stabiliser system. The standard kit lens is worthy of mention - this is no lightweight plastic model with a large aperture, but the LEICA D VARIO-ELMARIT 14-50mm/F2.8-3.5 lens, equivalent to 28-100mm in 35mm camera terms. So the Panasonic Lumix DMC-L1 is certainly a unique package, but can it compete with some tough competition in what is quickly becoming a crowded marketplace? Carry on reading to find out.
Compare Prices
Support PhotographyBLOG: Buy the Panasonic Lumix DMC-L1 from one of our affiliate retailers:Ease of Use
Lending the L1 premium status, the traditional-feel build is identical in appearance to Leica's more costly Digilux 3 camera. This, aside from its rangefinder-like chunkiness and added weight in comparison with budget DSLRs, partly justifies the hefty price tag (�1500 in the UK, with Leica D Vario-Elmarit 14-50mm f2.8-3.5 lens bundle). You also get such features as dust reduction in the shape of a Supersonic Wave Filter, and processing duties � including noise reduction � conducted by Panasonic's Venus Engine III.
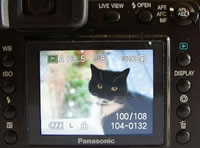
The bulk of body and lens combined is slightly ironic when you consider one of Olympus' foremost claims for Four Thirds was that it was meant to allow for physically smaller lenses and camera bodies. Something else that may be off-putting for those looking for � or upgrading from � a suitable baby DSLR, is the fact that the 7.5 megapixel top resolution provided by the Live MOS sensor falls short of the 10 megapixels typically offered by CCD or CMOS sporting DSLRs in this price range. Another talking point is the L1's ability to conduct live previews of the image via the LCD screen � a feature introduced by Olympus but still relatively unheard of on DSLRs. There's even a clearly marked, dedicated 'live view' button that sits above the monitor to allow users to do so.
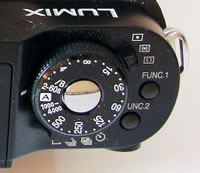
Atop the camera you get a dial for controlling shutter speed where a mode dial is more commonly located on comparative DSLRs. The dial has just the right amount of stiffness and resistance so that you don't accidentally flick past the setting you actually wanted. Ergonomically situated at its centre is a shutter release button, which is nicely springy to the touch. Below this dial are two levers. The forward situated lever falling under the forefinger controls the metering � spot, multiple or centre-weighted, while the rear lever � falling under the thumb � governs the drive modes. Here you get the options of single shot, burst mode (two high or low settings: 3fps or 2fps), auto bracketing and self-timer.
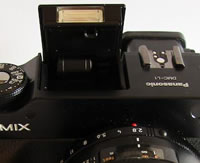
Between these two levers, and still on the camera top, is a pair of function buttons for rapid access to frequently used settings. These are used in conjunction with the LCD display, which can be tabbed through using the one-and-only command dial found on the rear of the camera. This might perhaps have been better located forward of the shutter release, but it falls under the thumb naturally enough. Immediately to the left of this, if viewed from the back, is the pop up flashgun, stored compactly flush to the body when not in use, and, again to the left, a hot shoe for supplementary flash.
| Main Controls - Rear | Main Controls - Top |
 |
 |
So to the camera front or 'business end': For those enthusiasts who relish the chance to get hands on, there's not just a manual focus and zoom ring around the supplied lens, but also one for manually selecting the right aperture too. A lens hood further augments the quality optic. Jutting forward beneath the Lumix logo on the body itself is a rubberized grip, which, though not especially prominent is just enough to allow a firm single handed hold on the camera when lens is attached. Top right of the lens, viewed from the front is the AF assist lamp/self-timer lamp, below which is the self-evident release button for the lens itself.
Moving to the right hand side of the camera (viewing it from the back) is a sliding door for the card compartment � the L1 takes Secure Digital cards only, and typically none is supplied out of the box. On the left hand side is an almost invisible flap covering ports for AV out/optional remote plus a five-pin USB. Beneath the camera there's a screw thread for mounting the L1 on a tripod, plus a door for the battery compartment, housed within the grip itself and protected from accidentally opening by a firm locking lever.
And so to the camera back, where the majority of function buttons are arranged in a horseshoe shape around the LCD, meaning that they fall readily under the thumbs of your right or left hand as you grip the camera and allow for rapid changes on the, er, hoof. Apart from the aforementioned live view button, next to this you get a button for activating the flash, adjacent to which is a three-way switch for switching between the focus modes � AFS (single shot auto focus), AFC (continuous auto focus) or manual focus. Inset within this switch is a thumbnail-activated AF/AE lock button, for fixing focus and exposure. Just below sits the playback button with the familiar horizontal green triangle icon, below which is the equally self-explanatory 'display' button, which of course turns the LCD display on/off.
Beneath this sits an aperture stopping down button which comes into its own when using the screen for shot composition � allowing you to check depth-of-field before pressing the shutter � while if using the viewfinder it has no effect at all. Just below is a dedicated delete button. Swapping over to the left hand side of the LCD, again looking at the back, and starting from the bottom up this time, is a really useful button for adjusting the intensity of the flash's output. Above this is a further button for swapping between the flash settings, and above this again another equally clearly marked button for selecting ISO speeds. The final button atop these on the left is one for adjusting white balance. With all of these, the buttons need to be held down and the command dial turned in tandem to effect changes.
Above these buttons � and to the far left of the camera back � juts back the eyepiece for the optical viewfinder, which, though reasonably clear in daylight, does become less useful in low light. For the short sighted among us typically it comes with its own dioptric adjustment dial to the left hand side. Still on the back, and to the top of the far right hand side, is a chunky on/off switch, below which is that command dial and, at the bottom of the right side, a four-way control pad that will be familiar to any digital camera user for tabbing through menus and captured images. With an initial press of the dual- use button in the middle marked 'menu/set' you get a series of menu folders on screen. Once you have used the control buttons to tab to the option you want, a second press effects any changes to the settings.
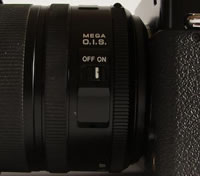
| Pop-up Flash | Mega O.I.S |
 |
 |
The four main menu folders are thus easily navigated and clearly laid out, divided into a shooting menu, a set up menu, a custom menu and a playback menu. The first, the shooting menu, features three screens: allowing the adjustment of the likes of image size and quality, as well as switching RAW recording on/of f � with JPEG being the default. More unusually, and a bit of an anachronism on a digital camera, you get the choice of four film modes � standard being the default setting, dynamic, nature and smooth being the others. In the set up menu you get the opportunity to adjust the basics like date and time, reset all options, adjust TV mode from PAL to NTSC and back, and slightly more usefully adjust monitor brightness. The third menu is the custom menu, which also allows the adjustment of colour space � from SRGB to Adobe RGB if warranted, plus the ability to turn long shutter noise reduction on/off or return all settings to the factory ones. The fourth and final playback menu allows you to set up image slideshows, rotate images, mark particular ones as your favourites, protect, resize or trim images or mark them for direct printing; all pretty standard stuff.
Although, in reality, there's not much here that will seem unfamiliar to a user of a basic DSLR or someone upgrading from a high level compact, the fact that the regular controls are found in different places and order means that it takes a little time to familiarize yourself with the L1. This is a camera use of which really appreciates with use in proportion to the amount of time spent with the user manual � helpfully a hard copy is provided for that very purpose.
It's also as responsive as you'd expect. The L1's LCD bursts into life on start up, and like budget DSLRs displays essential shooting information in the absence of a second LCD window atop the camera, though there's a wait of a couple of seconds before you can fire off a shot. A little tardy perhaps for those who want to do more than shoot landscapes, but then the L1 is a camera for those who want to manually adjust all those bells and whistles and really take the time to get it just right. Just pointing and shooting with such an investment is, well, pointless.
Though there's no sensor shifting anti shake mechanism built into the camera itself, the supplied lens does feature optical image stabilization (OIS), which � for the duration of our usage at least � to our eye achieved pretty much the same results as the likes of those with built-in anti-shake (Sony's Alpha 100 for one). But with the weight of all that hands-on photographic control behind it, does the L1 actually deliver shots you'd be proud to call your own?
|
![]() PhotographyBLOG
is a member of the DIWA
organisation. Our test results for the Panasonic Lumix DMC-L1 have
been submitted to DIWA
for comparison with test results for different samples of
the same camera model supplied by other DIWA
member sites.
PhotographyBLOG
is a member of the DIWA
organisation. Our test results for the Panasonic Lumix DMC-L1 have
been submitted to DIWA
for comparison with test results for different samples of
the same camera model supplied by other DIWA
member sites.