Gary's Parries 14/05/06
![]() This week’s Gary’s Parries topics are:
This week’s Gary’s Parries topics are:
1. Nikon D70 Front-Focused Images (Part II)
2. The Big Picture (Take Two)
3. Another Kodak Moment … Happy Mother’s Day !!!
Introducing this week’s Gary’s Parries column. Everything you always wanted to know about digital cameras, but were afraid to ask. No question too difficult, or too easy. As a Senior Principal Software Engineer, and a former Assistant Professor of Computer Information Systems, as well as a recording studio owner/operator, and now, a digital camera enthusiast, GARY has more digital camera knowledge in his entire brain than most people have in their little finger. In the unlikely event that GARY would not know the answer to your question, he will answer it anyway, true to the spirit of the word “Parries”, a fencing term which, in this context, implies “cleverly evasive answers”. So let your imagination run wild. Email all your nagging digital camera questions to: [email protected], and then, En Garde!
You may also attach to your email an ORIGINAL PHOTO of your choosing. A preview of the photo will be displayed with your question, and a full-sized version will be just a click away. No personal information will be published with your question unless you specifically include it in the text or attached photo of your email, which may be further edited for grammar, content, or other reasons.
***
*** QUESTION 1—- NIKON D70 FRONT-FOCUSED IMAGES (PART II)
***
 Dear Gary -
Thanks for addressing my humble request in last week’s column (Question 1).
I hope I don’t sound too pompous when I say that I have never used any of the so-called ‘idiot’ modes on the Nikon D70. Mainly because I hate the pop-up flash :). It’s P or A or S for me - too lazy for M.
I’ve tried various focus settings - Single Area seems simplest, but still leads to front-focused images. For a while I tried imitating the pros by setting the AE-L/AF-L button to Focus Only mode (you use this to activate the Auto-Focus, then release it when you’re on target to stop the camera checking focus between rapid-fire shots). I got the feeling it wasn’t helping the front-focusing issue, and it’s certainly a tad better now that I let the camera do its thing - but in low light it just hasn’t got the sensitivity to get it right, it seems (I even have the focus assist light enabled, though I hate that too).
A bit of me agrees with you that I should just swallow my pride and get a Canon 5D, but I’ve heard that it’s not immune to focus problems in low light, and it would mean a whole new set of lenses. The D2HS seems the only alternative…
Thanks for your patience,
Rupert
***
*** ANSWER 1
***
Rupert, have you heard the joke about the Engineer who was about to be executed by guillotine? The joke goes that, with the previous prisoner to be executed, the guillotine failed to come down on three consecutive tries due to a malfunction, so according to local law, the prisoner was set free. When it came time for the Engineer to be executed, the very same malfunction occurred on the first two tries, at which point the Engineer exclaimed, “I THINK I SEE THE PROBLEM !!!”
As an Engineer myself, I feel highly compelled to solve your D70’s front-focusing problem. With the information at hand last week, it seemed likely that you were using your camera’s Auto mode, which defaults to Closest Subject priority focusing. Now that you have provided new information, I THINK I SEE THE PROBLEM !!!
You said that you were using the D70 in Single Area Auto-Focus (AF-S) mode, and then using its AE-L/AF-L button to lock only the auto-focus. However, you also indicated that you were releasing the AE-L/AF-L button once you were on target, which I take to mean PRIOR to pressing the Shutter-Release button. But in order to maintain the auto-focus lock, you must keep the AE-L/AF-L button pressed until AFTER you have pressed the Shutter-Release; otherwise, the camera will just refocus as it normally does when you press the Shutter-Release.
I hope this resolves your front-focusing problem. If not, please let me know, and I will resubmit your question, as I really would like to help you find a higher-end SLR, should you still desire one.
[Note: Thanks to [email protected] for lending his expert knowledge of the D70. – Ed.]
***
*** QUESTION 2—- THE BIG PICTURE (TAKE TWO)
***
Dear Gary,
(Regarding Question 2 in last week’s column) I have made 2’ x 3’ enlargements with just a 6 megapixel camera, and there was absolutely no hint of pixilation. That work is currently on display at the Allen Center Gallery in Houston, TX, and can also be seen at www.allenparkway.com.
The enlargement technique that I use can be accomplished with Adobe Photoshop (or similar photo-processing application), as follows.
(1) Import the 6 megapixel image you wish to have printed at 2’ x 3’.
(2) Select Image>Image Size from the menu.
(3) Disable the Resample Image option.
(4) Set the larger of the image’s dimensions to 36” (the other will be calculated and set by the application according to the image’s proportions).
(5) Note the resultant resolution (as calculated by the application).
(6) Re-enable the Resample Image option.
(7) Choose the Bicubic Interpolation algorithm.
(8) Set the image’s resolution to exactly 2x or 4x the resolution that was obtained in step 5, so that the final resolution is approximately 180 ppi, or higher.
Example: If you import an image of 3072 (W) x 2048 (H) at 180 ppi, the picture size would normally be 17.067” x 11.378”. However, if you disable Resample Image and set the image width to 36”, the resultant resolution becomes 85.333 ppi. You then simply re-enable Resample Image, set the image’s resolution to (2 x 85.333 =) 170.666 ppi (close enough to 180 to work) or (4 x 85.333 =) 341.332 ppi (makes a monster file, but hey, there’s always a price for quality), perform the Bicubic resampling operation, and save the resampled image as a .TIF file.
Take your saved .TIF file to the local high-end photo imaging shop, request Fujichrome Crystal Archive Paper, and you will get an incredible 2’ x 3’ print!
Best regards,
Kerry Newcom
[Note: Kerry was being modest when he said his work is on display at the Allen Center Gallery. He is actually the gallery’s “Featured Artist” for the month of May. – Ed.]
***
*** ANSWER 2
***

 Kerry, interpolation is good, but never as good as the real thing. However, in keeping an open mind, I decided to check out your Urban Jungle exhibit at the Allen Center website. I particularly looked at your 2’ x 2’ tiger images (the ones without Brush Stroke effect applied). Based on your supplied 100% crops, I must admit, if you shot those images with a 6 megapixel camera, then I am very impressed with the results you obtained. I could not see any pixilation in the crops.
I was so impressed that I decided to try this technique for myself, but with the desired goal of printing an 8’ x 8’ image, in order to really put it to the test. I used one of Mark’s sample photos from his review of the 6 megapixel Panasonic Lumix DMC-FX01 (should have been named the FX10 to be consistent with the rest of the FX series). I also used the application GraphicConverter to perform the Bicubic resampling.
First I applied a bit of Unsharp Mask to the original 6 megapixel image. Next I cropped the image to yield a 9.252” square image of 2128 x 2128 pixels (4.5 megapixels) at 230 ppi. Then I resized the 9.252” image to 96” x 96” without resampling, which changed the resolution to 22.17 ppi. Finally, I rescaled the image with Bicubic resampling at a resolution of (8 x 22.2 ppi =) 177.36 ppi (which I rounded up to 178 ppi because I like to use whole number resolutions, but that forced the dimensions down slightly to 95.640” x 95.640” in order to yield a dimensional change of EXACTLY 800%).
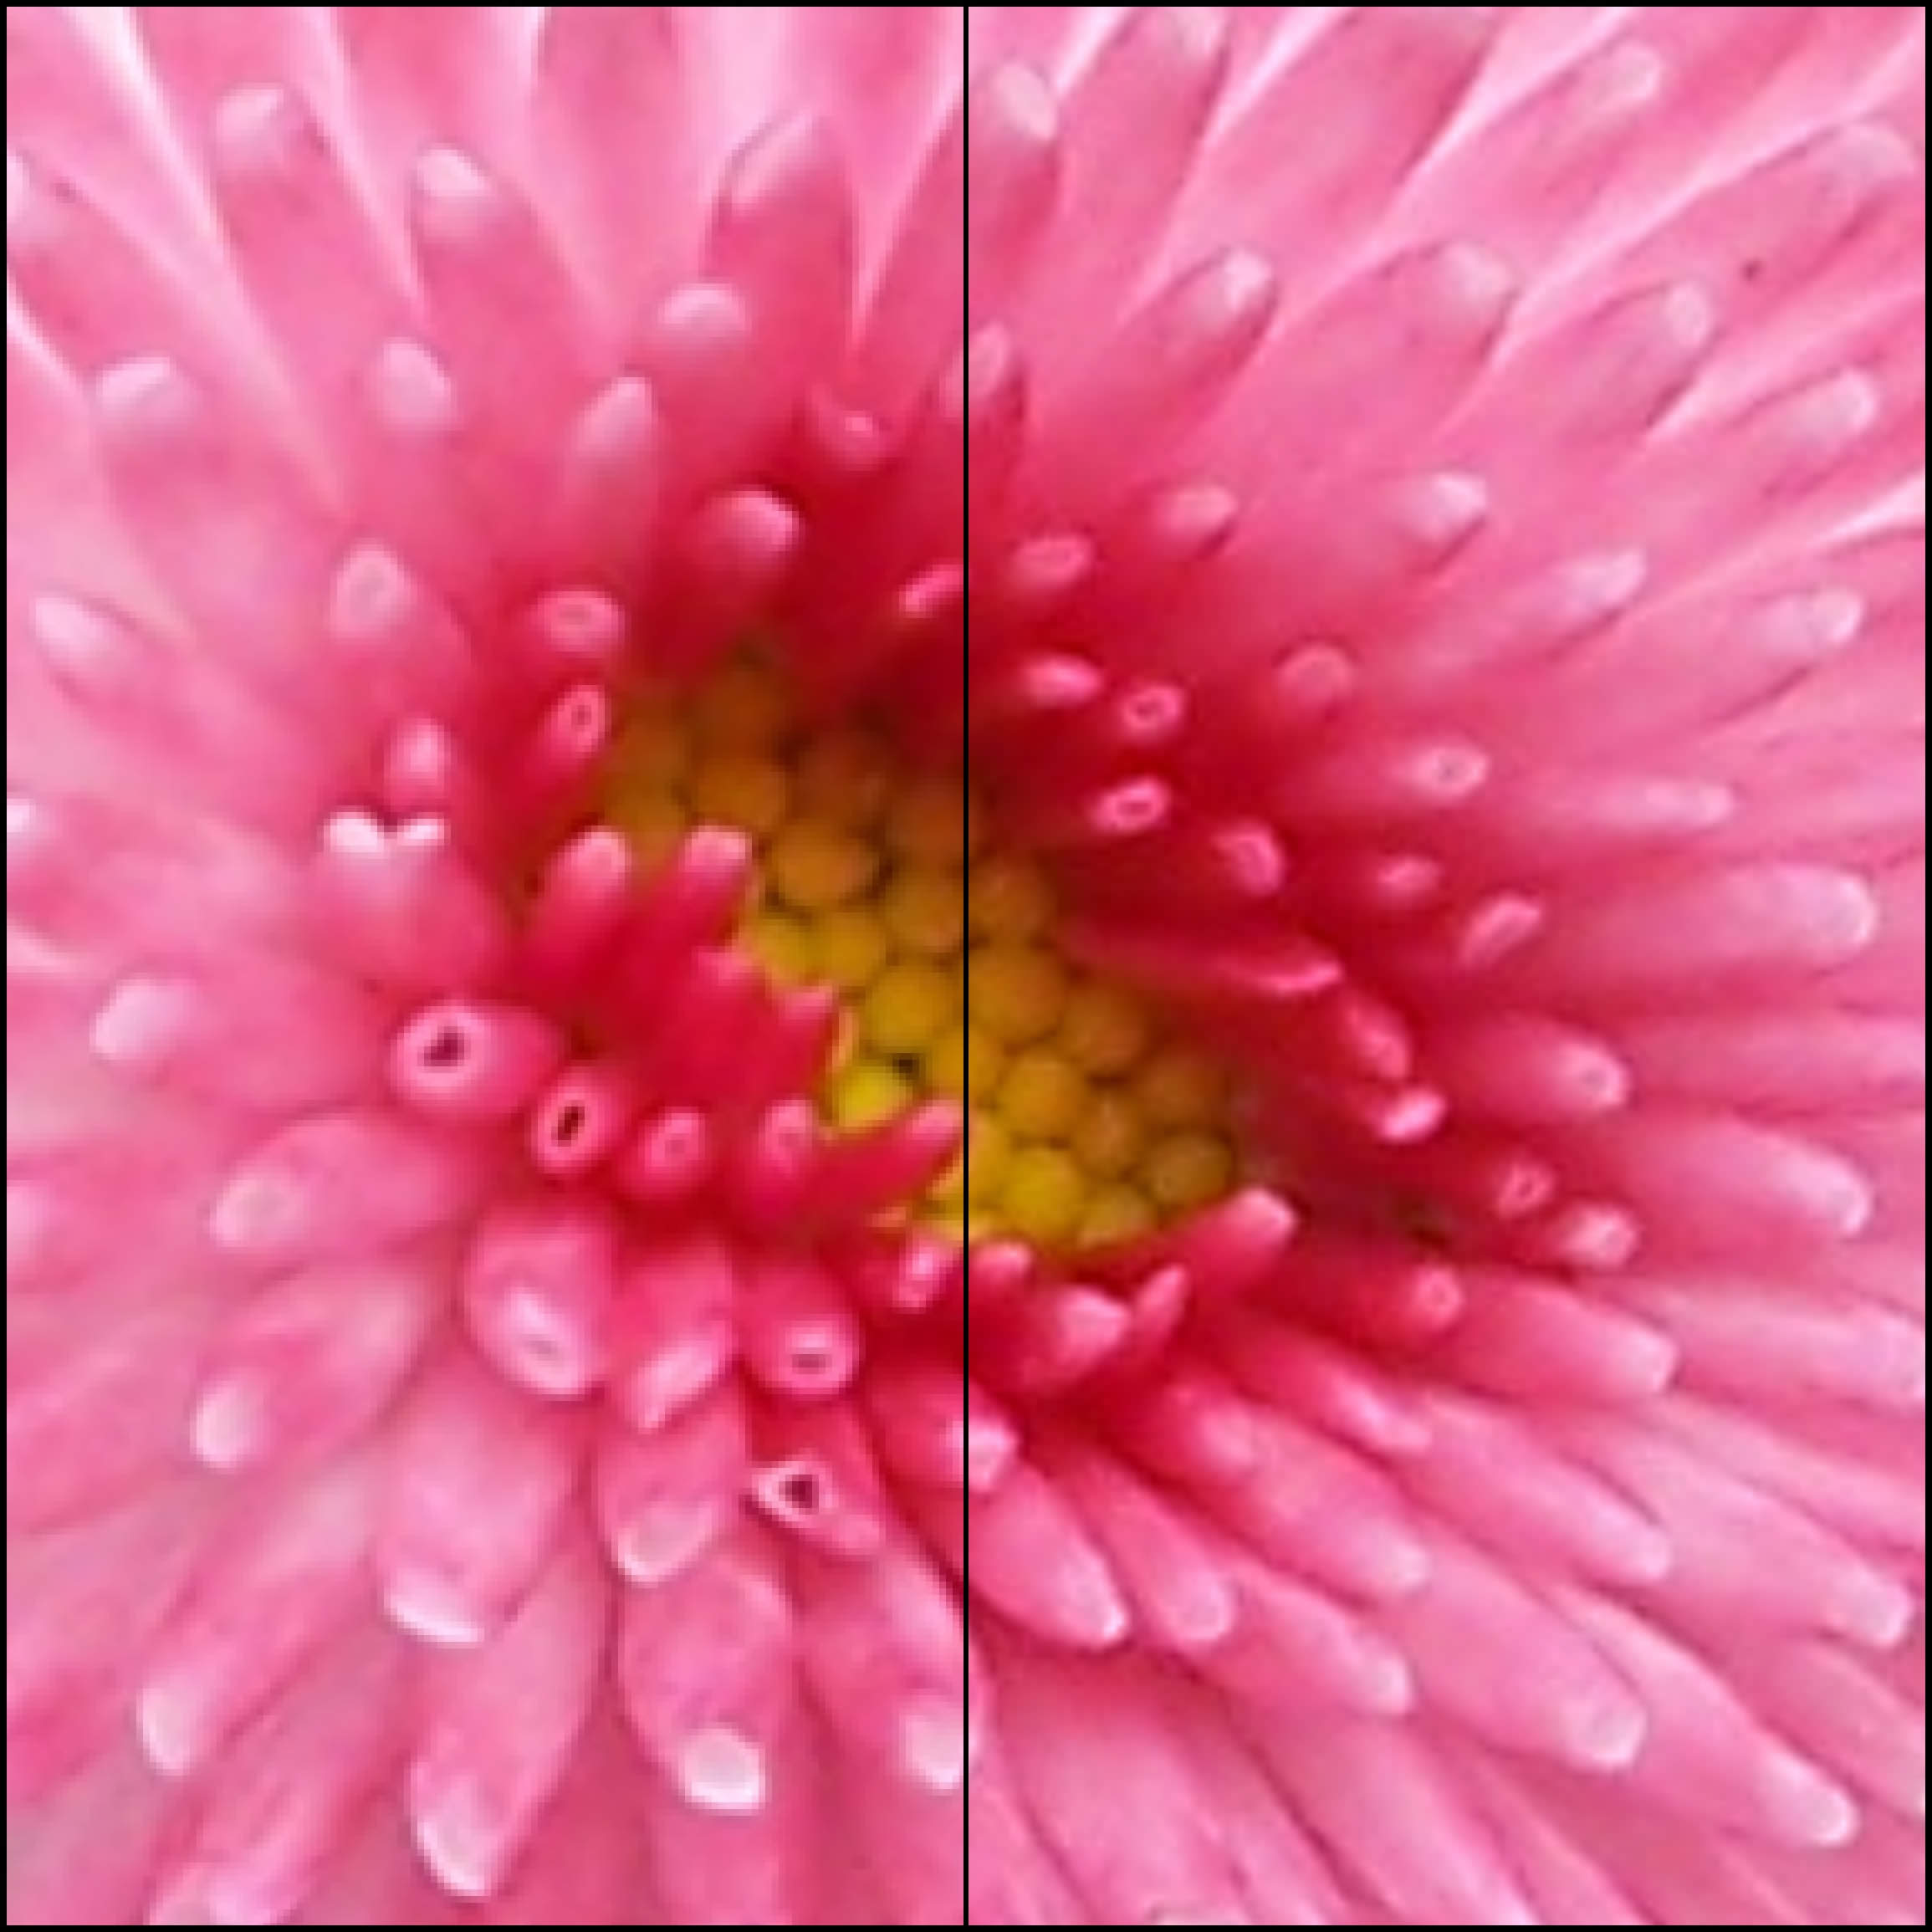
You can view the results by clicking on the first thumbnail to see the sharpened original, and then on the second thumbnail to see a 100% crop of the 8’ x 8’ scaled image. The left half of the 100% crop shows the pixilation that occurs without Bicubic resampling, and the right half of the 100% crop shows how Bicubic sampling completely eliminates the pixilation, which after all, was the main concern of last week’s question.
So does that mean you should abandon your hopes for a 13 megapixel Canon 5D and purchase a 6 megapixel Canon Digital Rebel or Nikon D70s? If your main concern is pixilation, and you want to save a few thousand dollars, then maybe it would not be a bad idea. However, while you will not have to worry about pixilation, you also will not get the resolution and fine detail (among other things) that a professional SLR can provide.
Having said that, I must also say that Kerry’s “wildlife” images were absolutely stunning, and I would highly recommend checking them out at www.allenparkway.com , or if you are in the neighborhood, at the Allen Center Gallery, 1 Allen Center, Houston, TX.
***
*** QUESTION 3—- ANOTHER KODAK MOMENT … HAPPY MOTHER’S DAY !!!
***
 A lot of pictures that otherwise would not be taken, are captured forever. Life is just a memory.
I take a daily picture of my Family, and recently got some “keepers” showing the versatility of the V570. This morning the sun was over-powering, resulting in a high-contrast image, but I’m sending it anyway to show you this little park I go to each morning.
Semper Fi,
Nick and Family
***
*** ANSWER 3
***
Nick, I am always amazed at the variety of photo serial numbers I receive from you, sometimes even in a single day’s shooting. I can just picture you all loaded up with your photographic gear when you go out shooting, although on this day, you probably could have fit the whole thing in your pocket.
I see what you mean about the V570’s 23mm lens producing some awesome landscapes. It gives you a 180-degree view with just three shots. My question to you is (wait a minute, shouldn’t you be asking me a question), can’t you get the same effect with a 38mm lens, using four shots?
Nice Mother & Son picture. Any relation to you? HAPPY MOTHER’S DAY !!!
***
[Column photo “The Photographer” by Brenda LaFleur of Brenda LaFleur Photography.]