Epson P-4000 Multimedia Storage Viewer
Review Date: July 17th 2006
Leave a Comment about this Review
|
Ease of Use
The Epson P-4000 Multimedia Storage Viewer is a gorgeously designed device that impresses from the first moment that you first take it out of the box. Resembling the PlayStation Portable gaming device in terms of design layout, the Epson P-4000 is dominated by its 640x480 resolution, 3.8 inch LCD screen, which has 921,600 pixels. It's difficult to describe how impressive the picture quality is without actually seeing it for real - screen and product shots just don't do it justice. Seeing your images on such a big and clear LCD really makes them come alive, making the Epson P-4000 suitable for reviewing your photos whilst out in the field and for showing them off to friends and family when you get home. Importantly the screen doesn't seem to be prone to scratches - the review sample that I received from Epson UK did not have a single scratch or mark. The Epson P-4000 is not the most compact portable storage device on the market, measuring 142mm x 23mm x 91.5mm and weighing 415 grams.
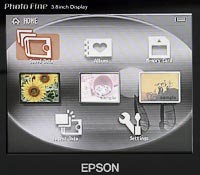
You turn the Epson P-4000 on by sliding the Power switch and are then greeted by a minimalist splash screen graphic before being taken to the Home screen (shown below). This is the control centre of the Epson P-4000, displaying a battery level indicator at the top right and 3 rows of icons that represent the various options that can be accessed. The top row contains 3 options called Saved Data, Albums and Memory Card. The middle row contains 3 icons which represent shortcuts to your favourite albums. The bottom row contains 2 icons called Latest Data and Settings.
Selecting the Saved Data option displays all of the data that you have saved onto the Epson P-4000 represented as folders, either by the day on which it was saved, or in the order in which it was copied from a memory card. Choosing one of these options then displays thumbnail versions of all the files in that folder. The Albums option on the Home screen does exactly the same thing for all the custom albums that you have created. When a memory card is inserted into the Epson P-4000, selecting Memory Card displays a menu with 3 options - Copy data from memory card, Create album after copying data and Browse memory card. Copying data onto the Epson P-4000 is therefore a 3 stage process - insert the memory card, select the Memory Card option on the Home screen and then choose exactly how you want to download it.
There is also an important option in the Settings menu that has a direct effect on the copying process. Copy Mode has two options - Delete Data After Copying or Do Not Delete. The first option will automatically delete the files on your memory card after they have been downloaded onto the Epson P-4000. In my opinion this could result in losing files if for some reason the transfer from memory card to the Epson P-4000 wasn't successful, so I would strongly advise you to set this to Do Not Delete and then format the card in your camera, after you have checked that the files are safely on the Epson P-4000.
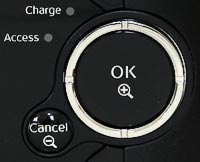
| Epson P-4000 LCD Screen | OK/Zoom In / Cancel/Zoom
Out Navigation Collar |
 |
 |
The middle row of icons on the Home screen are basically shortcuts to your favourite custom albums. You can only have 3 shortcuts at any one time. Initially confusing if you already have 3 shortcuts setup is that you have to remove an album as a shortcut in order to replace it with a new one. Also having only 3 shortcuts on the Home screen is a little limiting, especially as you can't nest albums within each other. I found that I tended to ignore the middle row of album shortcuts and accessed my data via the Albums icon on the top row instead.
The bottom row of icons on the Home screen contains two options. Latest Data contains thumbnails of all the data that has been downloaded in the last day. This is a useful way of quickly checking that your data has been successfully copied onto the Epson P-4000. Settings contains 10 options that allow you to tweak how the Epson P-4000 actually works. You can change the brightness of the LCD screen, configure button sounds and volume, find out how much hard drive space has been used and a number of other things. The current firmware version is also displayed at the bottom right of the screen. One important option is in the View Mode menu. Folder View Mode has three settings - View by Memory Card and View by Date. I would suggest that you choose the first setting if you copy files from a variety of memory card formats. If you only use one format, set this to View by Date instead.
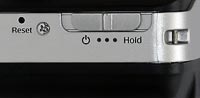
The external controls of the Epson P-4000 are as well-designed and simple to understand as its menu system - you don't even need to read the well-written manual in order to start using it. To turn the Epson P-4000 on, you slide the Power Switch on the side of the device down. To turn it off, you slide it down and hold it there for a couple of seconds until the Access LED turns red and the blue Illumination lamp turns off. The Hold button allows you to make the controls of the unit inactive, useful when you are carrying the Epson P-4000 in a bag whilst listening to music. Next to the Power Switch is a tiny Reset button that can only be activated by using a needle, pen tip or something of similar width. Epson suggests that the Reset button should be used when "an error occurs or operations cannot be done". I didn't have to use it during this review.
On the front of the Epson P-4000, to the right of the LCD screen, are the main controls. Working from top to bottom, Print can be activated when an image is displayed. It allows you to print the image to a compatible Epson printer and presents a number of different menu options. Menu displays a context sensitive menu for the currently selected icon - it is the equivalent of right-clicking in Windows and displays different options that are relevant to what is selected. The large round OK button is designed to be used by your right thumb and either selects something or is used to zoom in on an image. Surrounding the OK button is a thin silver Navigation collar that allows you to move around the onscreen icons. It has a slightly "squidgy" feel to it and makes a slight clicking noise. The much smaller Cancel button either returns you to the previous screen or zooms out of an image. Pressing the Display button will show a certain level of information about what is currently selected. If you are viewing an image, for example, it will show EXIF information for that image (if available), such as shutter speed, date and focal length. The Display button is also used to show helpful tips about accessing an icon or folder. Pressing the Home button simply returns you to the Home screen.
| Reset Button / Power On/Off/Hold Switch | Battery Compartment |
 |
 |
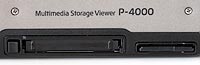
There are two memory card slots which allow you to insert either Compact Flash, MicroDrive or SD cards. You need to purchase a CF adapter in order to use other card formats with the Epson P-4000 (obviously adding to the overall cost). A very nice design feature is that the memory cards go all of the way into the Epson P-4000 without sticking out of the slot. This means that you can insert your memory card, start copying the data, set the Power Switch to Hold, put the Epson P-4000 into your bag and forget about it while the data is being copied, without having to worry if the card will be knocked out of position or the wrong button being inadvertently pressed. If you're in the middle of a busy shoot, this could could be an important factor in being able to efficiently carry on with your work.
The external controls on the left hand side of the Epson P-4000 are all ways of connecting to the device. There is an A/V Out connector, Headphone connector, AC adapter connector (used for powering and recharging the Epson P-4000) and finally a USB connector, which is protected by a hard rubber cover. On the rear of the device is the speaker and in the bottom right corner is the battery compartment. The Epson P-4000 is powered by a long and thin 3.7V, 2600mAh rechargeable Li-Ion battery. I would estimate that I used the Epson P-4000 for about 3 hours for copying and viewing before it needed to be recharged, slightly below Epson's claim of 3.2 hours but very respectable never-the-less.
I also decided to test how much data I could transfer onto the Epson P-4000 before it ran out of power. I copied a massive 13 cards of 1Gb data before the battery icon started showing that it was becoming depleted. It took 4 minutes 45 seconds to transfer each card. Unlike many portable storage devices, the battery in the Epson P-4000 can be taken out and swapped for another one, so you can buy and carry a spare with you if you require even longer performance. Connecting the Epson P-4000 to your computer is as simple as using the supplied USB cable. The Epson P-4000 appears on your PC or MAC as a new hard drive. You can then copy files onto your computer or vice-versa using the usual copying methods that your computer offers. Epson recommends that you use the supplied AC adapter to power the device whilst copying files across, but if you have a full battery charge you don't have to use the AC adapter. The Epson P-4000 has a high-speed USB 2 connection, which in the real world translated into a fast transfer time of 45 seconds for 1Gb of data.
| USB Connector (usually protected by a plastic flap) |
Memory Card Slots |
 |
 |
The Epson P-4000 will display JPEGs from any digital camera and allow you to zoom in and out onscreen. Of greater interest to photographers who use digital SLRs is that the Epson P-4000 will also display full screen previews of RAW files from certain cameras (although somewhat disappointingly it won't allow you to magnify them). This make the Epson P-4000 one of the few portable storage devices capable of both storing RAW files and allowing you to view them and is great news for the DLSR owner who uses the RAW format. If your camera is not supported, then you can still transfer your RAW images onto the Epson P-4000, but you won't be able to see a preview version of them (just a small generic thumbnail icon instead).
From a usability point of view the Epson P-4000 is an extremely stylish device that is equally as straight-forward to use. Out in the field where it really matters, the Epson P-4000 provides quick transfer from memory cards, long battery life and the invaluable ability to actually view your images and verify them, all in a relatively compact package that can be hung from your belt or stored in your camera bag.
|