Konica Minolta DiMAGE X1
Review Date: October 17th 2005
|
Ease of Use
The Konica Minolta DiMAGE X1 fits into the super-thin, super-stylish, point and shoot category of digital cameras. Measuring a mere 19.5mm deep and 95mm wide and weighing only 135g, this is a camera that you can carry around without noticing, and one which you can use without drawing the attention of other people. The plastic, silver coloured body is stylish without being too over-the-top. Perhaps more importantly, it's also quite durable and doesn't mark or scratch easily. The rear of the camera is dominated by the large 2.5 inch LCD screen (included at the expense of an optical viewfinder). Konica Minolta have wisely fitted a protective screen, which allows you to carry the camera in your pocket without worrying that you will scratch the LCD. If the appearance of your digital camera is important to you, then you won't be disappointed with the Konica Minolta DiMAGE X1.
The 3x optical zoom lens used on the Konica Minolta DiMAGE X1 is a non-extending model, so the true depth of the camera remains 19.5mm. Even better, the lens does make some noise as the lens cover opens and it zooms in and out, but it is barely discernible, making this a great camera for more candid moments when you don't want your subject to know that you're taking their picture. At 38mm it's not the widest lens around, but the telephoto end of 111mm is perfect for head and shoulder portraits.
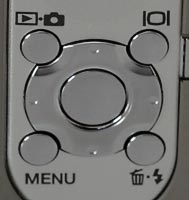
The Konica Minolta DiMAGE X1 is fairly comfortable to hold. Your right thumb naturally rests on the smooth recessed area underneath the zoom lever. The Zoom button is easy to operate, despite being quite flat against the camera. More problematic, at least until you become accustomed with the camera, is the way in which you grip it with your left hand. The lens is positioned in the extreme top-right corner, which means that it's all too easy to accidentally include the fingers of your left hand in the photo! A little bit of re-education is needed to avoid this. One design element that I liked more was the navigation pad and the array of 4 buttons at each corner. This design cleverly locates all of the major external controls in one place without making it seem too cluttered. Subsequently a lot of settings can be accessed using only your right thumb, speeding up the overall operation.
| Play/Camera / Display / Menu / Delete/Timer / Navigation Pad / Select Button | Zoom Lever |
 |
 |
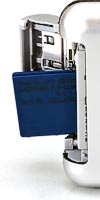
At first glance it seems that Konica Minolta have chosen to bury some commonly used features, such as ISO speed and Exposure Compensation, in the menu system, instead of making them easily accessible via external buttons. A bit of investigation, however, reveals that you can set the up/down and left/right arrows on the navigation pad to custom settings. I quickly assigned them to, yes you've guessed it, ISO speed and Exposure Compensation - perfect! All 10 external controls are clearly labeled using industry-standard symbols and terminology. Overall the camera body feels well-designed and not too cluttered, despite the presence of that large LCD screen and the small dimensions of the camera. Obviously this is helped by the omission of an optical viewfinder, something which you should take into consideration if you are interested in the Konica Minolta DiMAGE X1. The design elements that I least liked were the battery/memory card compartment cover, which didn't open and close very precisely, and the exposed USB connection on the bottom of the camera.
If you have never used a digital camera before, or you're upgrading from a more basic model, reading the comprehensive and easy-to-follow manual before you start is a good idea. Konica Minolta have thankfully chosen to provide it in full in printed format, rather than on a CD. The menu system on the Konica Minolta DiMAGE X1 is as well designed as the exterior of the camera. It uses an intuitive tabbed interface with 4 numbered pages and a Setup option at the top of the screen. There are only ever a maximum of 5 options per page, which are all shown onscreen at the same time, so no scrolling through an endless list trying to find that elusive option. The large LCD screen really makes a difference to using the menu system, as all the options are clearly displayed in a generously sized typeface. This tabbed system may be harder to implement on a more complex camera than the Konica Minolta DiMAGE X1, but for this model it perfectly suits the new photographer.
There is one innovative feature on the Konica Minolta DiMAGE X1 that aims to make life easier for you. This camera has an anti-shake system - turn it on and the Konica Minolta DiMAGE X1 automatically compensates for camera shake, which is a slight blurring of the image that typically occurs at slow shutter speeds. In practice I found that it does make a difference, as shown in the examples on the Image Quality page. You don't notice that the camera is actually doing anything different when anti-shake is turned on, just that you can use slower shutter speeds than normal and still take sharp photos.
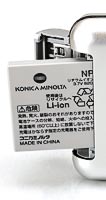
However, what Konica Minolta gives you in the form of an effective anti-shake system, it takes away by only providing a limited ISO range of 50-200. This essentially means that you really need to leave the anti-shake system turned on all the time to compensate for the slow shutter speeds (especially as ISOs 100 and 200 exhibit high levels of noise - see the Image Quality page), which kind of negates any real advantages that the anti-shake system offers. This would be fine if battery-life wasn't so badly affected - I managed to take 90 shots with some image playback before the battery ran out.
| Memory Card Slot | Battery Compartment |
 |
 |
The start-up time from turning the Konica Minolta DiMAGE X1 on to being ready to take a photo is very quick at 1 second, and it takes about 1 second to zoom from the widest focal length to the longest, and back again. Focusing is very quick in good light, although the camera has a tendency to hunt around for focus indoors or in low-light situations, caused by the lack of a focus assist lamp. The visibility and refresh rate of the 2.5 inch LCD screen are perfectly acceptable, although with only 118,000 pixels it is noticeably grainy. It takes about 1.5 seconds to store an image, allowing you to keep shooting as they are being recorded onto the memory card - there is no LCD blackout between each image. In the continuous shooting mode the camera takes 3 photos at 1.5 frames per second at 3264x2448 pixels, not exactly lightning fast. This can be greatly improved by selecting the UHS continuous mode, which allows 15 shots to be taken at 10 frames per second, but unfortunately this only works at 640x480 pixel resolution. All in all the Konica Minolta DiMAGE X1 is average in terms of operational speed.
Once you have captured a photo, the Konica Minolta DiMAGE X1 has an average amount of options when it comes to playing, reviewing and managing your images. You can instantly scroll through the images that you have taken, view thumbnails, zoom in and out up to 6x magnification, view slideshows with or without a dissolve effect, add an audio clip (15 seconds maximum) to each image, delete, lock, crop and rotate an image. The Display button toggles limited settings information about each picture on and off, such as the image size, date and number, but there is no histogram available during shooting or playback, an important feature that is helpful in evaluating the exposure and which many other cameras in this price bracket offer. The Konica Minolta DiMAGE X1 also supports DPOF for easy direct printing and you can email a 640x680 JPEG.
On the whole the Konica Minolta DiMAGE X1 is a stylish, simple and easy to use digital camera, which is not particularly quick in terms of operation and doesn't offer too many advanced features. The anti-shake system works well and does make a difference, although its effect is largely reduced by the limited ISO range.
|
![]() PhotographyBLOG is a member of the DIWA organisation. Our test results for the Konica Minolta DiMAGE X1 have been submitted to DIWA for comparison with test results for different samples of the same camera model supplied by other DIWA member sites.
PhotographyBLOG is a member of the DIWA organisation. Our test results for the Konica Minolta DiMAGE X1 have been submitted to DIWA for comparison with test results for different samples of the same camera model supplied by other DIWA member sites.