Epson PictureMate
Review Date: April 4th 2005
|
Ease of Use
The Epson PictureMate is about the same size as a household toaster, albeit one with a handle! It is marginally bigger than the HP Photosmart 375 that I reviewed a couple of weeks ago. In general the Epson PictureMate is very well made, although the memory card cover feels flimsy when opened. This is also true for the paper catcher and paper feeder. I'm a little unsure about the usefulness of the handle. It obviously makes it easy to carry the printer around, but it does tend to get in the way and if you don't actually take the PictureMate anywhere, you may start to wish that you could remove it (which you can't).
Installing the Epson PictureMate is straight-forward, especially if you don't connect it to your computer, and after just 5 minutes I had printed out my first image. You just need to connect the power cable, turn the printer on and install the very large single photo cartridge in the rear of the printer. Remember to shake the cartridge 5 or 6 times as the pigment ink that it uses has a tendency to settle at the bottom. The supplied Quick Install Poster helps to make the installation a very simple process.
To print a photograph from a memory card, insert it into the relevant slot on the front of the printer. I used a variety of card formats without any problems. The Epson PictureMate recognises that you have inserted a card, the Print button lights up green and the main menu is displayed. The PictureMate only has a monochrome LCD screen, with no option to fit a colour one, and it does not show a preview of each image on the card - the HP Photosmart 375 has a colour screen and does show a preview.
Selecting which photos you want to print from a memory card on the Epson PictureMate is not as intuitive as the HP printer. If you know what order they are in you can select which ones to print by choosing the numbers that correspond to them e.g Photo 1, Photo 5, Photo 22 and so on. If you have no idea what is on the card, then you can print an index sheet with 20 thumbnails and then select the photos. This system works but it's not the most efficient way of selecting photos and certainly not as effective as seeing and selecting them on the LCD screen. It will also waste paper if you keep having to print out index pages.
After you have selected which photos to print, you can decide on the layout, number of copies (maximum of 10), and add things like colour effects and date stamps. There is also a Print Wizard that you can enable which guides you through the entire print process - tellingly the first thing that it asks is if you want to print an index sheet of all the photos on the memory card.
There are not many external controls on the Epson PictureMate and they are all fairly self-explanatory. This printer has been designed to be used by all the family. The only control that may initially confuse is the Save Photo button, which allows you to backup the contents of a memory card to an external device such as a CD writer. I think Epson should have placed this option in the menu system rather than giving it a dedicated button.
When printing directly from a computer, the Epson PictureMate's driver software is very easy to use simply because it doesn't offer many options due to there only being one available type of paper. I opened my images in Adobe Photoshop and then printed them via the File > Print with Preview command. This allows you to access the Epson PictureMate's software and select the best settings for the current image. Here are the various screens that you can access:
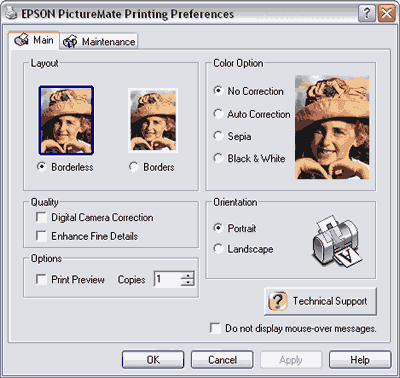
The Main tab gives you access to all the creative options (not that there are too many to choose from). Enhance Fine Details in the Quality section is an important setting if you want to get the very best image quality from the PictureMate - read the Image Quality page for more details.
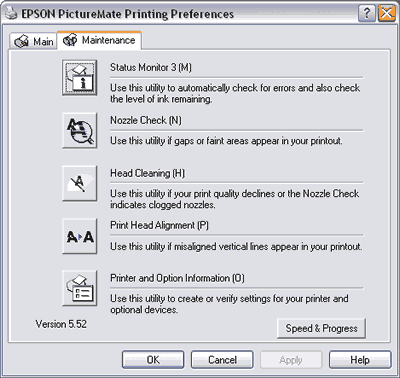
The Maintenance tab will be familiar to anyone who has used an Epson printer before. Print Head Alignment is performed when you install a new cartridge, so you shouldn't have to manually use this option.
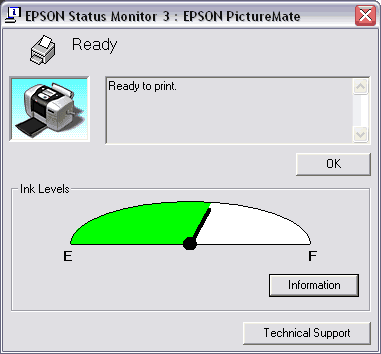
The Status Monitor window is shown whenever a print is made. The PictureMate only has one cartridge containing all the available colours, so you can only see the remaining ink status for the cartridge as a whole.
In terms of speed, the Epson PictureMate took 2 minute 25 seconds to print out a 5Mb image as a borderless print when it was operating in standalone mode. It took 2 minutes 5 seconds to print the same image as a print with a thin white border. With Enhance Colour Correction selected, the time for a borderless print was 2 minutes, 25 seconds, and with Fix Colour Correction selected it was 3 minutes 2 seconds. The standalone print time was calculated from pressing the print button to the final print arriving in the paper tray.
When it was connected to a computer, the Epson PictureMate took 2 minute 37 seconds to print out the 5Mb image as a borderless print. It took 2 minutes 5 seconds to print the same image as a print with a thin white border. With Enhance Fine Details selected in the driver settings (which provided the best image quality), it took a lengthy 4 minute 5 seconds to print out the 5Mb image as a borderless print. The print time was calculated from clicking Print to the final print arriving in the paper tray.
| Standalone/Computer | Borderless | With Border |
| Standalone | 2 mins 25 secs | 2 mins 5 secs |
| Standalone (Enhance Colour Correction) | 2 mins 25 secs | - |
| Standalone (Fix Colour Correction) | 3 mins 2 secs | - |
| Computer | 2 mins 37 secs | 2 mins 5 secs |
| Computer (Enhance Fine Details) | 4 mins 5 secs | - |
Overall the Epson PictureMate is well made and intuitive to use, although the lack of a colour LCD screen and the ability to preview images when using a memory card is an oversight on Epson's part. The Epson PictureMate is also quite a slow printer and therefore not best suited to high volume use.
|