Ricoh R10 Review
Review Date: October 20th 2008
Author: Mark Goldstein
Leave a comment about this Review
|
Introduction

Announced just 7 months after its predecessor, the R8, the new Ricoh R10 is the latest addition to Ricoh's 7x zoom digital compact camera line-up. Offering the same versatile 28-200mm focal length as the R8, the most significant change to the R10 is a larger and higher-resolution 3 inch HVGA LCD screen. Other new features include an innovative electronic level to help ensure straight horizons, an Easy shooting mode aimed at beginners, the addition of a customisable Function button, the ability to alter the flash intensity, and Auto level compensation, which automatically adjust tones to avoid clipping the highlights and shadows. The Ricoh R10 retains the same 10 megapixel sensor, Smooth Imaging Engine III image processing engine, CCD-shift vibration correction, face recognition and 1cm macro mode as the previous R8 model. Despite the current gloomy economic conditions, Ricoh have also managed to reduce the recommended retail price by �50, to �199 in the UK. We've always been impressed by the careful attention to detail that Ricoh lavish on their cameras, but less so by the image quality - is the R10 any different? Mark Goldstein found out...
Ease of Use
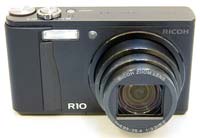
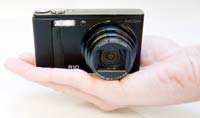
The Ricoh R10 is slightly deeper than the older R8 model at 26.1mm (D), an increase of 3.5mm, but otherwise it measures (102.0 mm (W) x 58.3 mm (H)) and weighs (168g) exactly the same. This is a compact digital camera that easily fits in the palm of your hand, and you certainly won't notice carrying it in a trouser/shirt pocket or a handbag. The R10 is available in either silver, bronze or black - Ricoh provided the latter for our review. It retains the rather understated, retro look of the R8, which will appeal to fans of compact Contax film cameras, for example. The external differences between the R10 and the R8 are subtle - there's a new rubberized handgrip area on the front, extra Function button on the back, the larger LCD screen, and that's it. As soon as you pick it up, the Ricoh R10 feels solidly made, refined and purposeful, with no drop in build quality despite the drop in the asking price.
Despite all the external design changes, the Ricoh R10 retains its 28-200mm zoom range, still a truly amazing feat of engineering in such a small camera. When the lens is fully extended, the camera measures over 7cm in depth, but thankfully it retracts fully back into the body when it is turned off. The 28-200mm range is incredibly versatile, covering everything from wide-angle landscapes to close-up action photos. Ricoh were the first manufacturer to include a 7x zoom lens in a compact camera, and even though most of the other competitors now offer similarly-specced models, the R10 is still one of the most compact designs on offer. The new rubberized hand-grip makes it much easier to hand-hold the Ricoh R10 and get sharp results at the telephoto end of the zoom range.
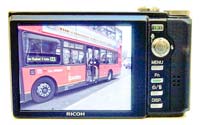
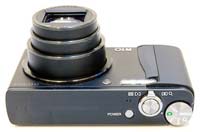
The Ricoh R10 only has 10 external controls in total, leaving plenty of room for the new 3 inch LCD screen that dominates the back of the camera. There's a DSLR-like dial on top of the camera which lets you select from the Camera, Movie and Scene options, plus two settings called MY1 and MY2 which allow you to configure the R10 for different uses and allows quick access to each configuration (the camera remembers the settings when it's turned off). There's also an extra option marked Easy, a new shooting mode aimed at beginners. The only options that can be changed when the R10 is set to Easy mode is the Pic Quality/Size, and by pressing the Fn button, turning backlight compensation on. Note that the camera also returns to its default settings in Easy Mode. It's especially useful for the less experienced photographers in your family, or for asking other people to take photos of you when you're on vacation.
 |
 |
| Front | Rear |
By default the Adjust button, or more accurately the Adjust four-way joystick, allows you to quickly adjust 4 different settings that are commonly used. Press it to alter Exposure Compensation, White Balance, ISO Speed and the AF Target, which allows you to shift the target for AF or AE or both without having to move the camera. Even better, the Adj. menu is customisable - you can add another setting to it and also choose what the first four settings do, allowing you to control exactly what you want quick access to. The Adjust button also doubles up as the OK button to select options and it sets the Macro and Flash options by pressing left and right - there's another button underneath to access the Main menu system. Ricoh have also added a customisable Function (Fn) button, which can be optionally used to control one of 7 settings. In theory it all sounds like a convoluted recipe for disaster, but in practice it works well, allowing quick access to most of the major functions of the camera without having to scroll through the menu system.
The Ricoh R10 is a point and shoot camera with no advanced exposure controls - Ricoh don't want the R10 to steal market-share from their more professional and more expensive cameras. Having said that, the R10 does have a few notable tricks up its sleeve. The improved AF/AE Target Selection mode allows you to shift the target for both auto focus and automatic exposure without having to move the camera, useful for tripod-mounted macro subjects, but now also available in any shooting mode. The [F1:1] Picture Size, as previously seen on the GX100 and GR Digital II cameras, allows you to record your photos in square format (7 megapixels), similar to some medium format cameras, offering a new perspective on the world. The Fix minimum aperture function forces the camera to shoot at the smallest aperture available, which gives a greater depth of field in the resulting photograph. Finally, the new Auto Levels option (part of the Image Settings menu option) is a useful addition for high-contrast subjects, automatically adjusting tones in the image to avoid clipping the highlights and shadows. It's by no means fool-proof, but it does seem to preserve a little more detail at either end of the histogram. The only downside is that because its one of the 7 Image Settings options, you can't also choose B&W at the same time, for example.
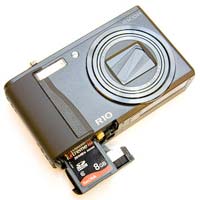
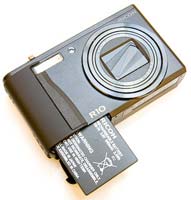
The Ricoh R10 features an anti-shake system called Camera Shake Correction - turn it on in the Main menu and the Ricoh R10 automatically compensates for camera shake, which is a slight blurring of the image that typically occurs at slow shutter speeds. You don't notice that the camera is actually doing anything different when anti-shake is turned on, just that you can use slower shutter speeds than normal and still take sharp photos. Ricoh seem to have realised the importance of this system, as it is turned on by default, and thankfully leaving the anti-shake system on didn't negatively affect the battery-life, with the camera managing over 275 shots before the battery needed to be recharged (comparable to the R8).
|
The electronic leveler is a brand new addition to the R10, an innovative feature borrowed from the GR Digital II and GX200. This helps to ensure level shots, both in landscape and portrait mode. You can view the horizontal indicator on the LCD monitor to ensure that shots are aligned horizontally. If you can't see the LCD screen in very bright sunlight, then the camera can also be set to make a sound to indicate a level horizon. It doesn't sound like a big deal in theory, but in practice it really helps to make the horizons in all your wide-angle shots perfectly level. Another very welcome addition is the ability to set the flash intensity, which can be adjusted in 1/3 EV steps across the -2.0EV to +2.0EV range, which gives you precise control over the flash output.
The face recognition feature offered by the Ricoh R10 didn't make a great deal of difference if I'm being honest, as there's the tendency of the user to pre-focus on the subject � and obviously a face if taking a portrait � before fully pressing the shutter button anyway. It's a pretty simple system recognising a maximum of just 4 faces, and Ricoh have also chosen to make it a specific scene mode, rather than a general setting that applies to whichever shooting mode is currently selected, which rather limits its usefulness. Face recognition does work if the subjects are looking directly at the camera, but the R10 takes a while to lock onto the subject, and I think that the tried and trusted method of half-pressing the shutter button to focus and then recomposing the shot is a quicker and more reliable method.
The main menu system on the Ricoh R10 is straight-forward to use and is accessed by pressing the Menu button on the rear of the camera. There are two main menus, Shooting and Setup. Quite a lot of the camera's main options, such as image size, sharpness, metering mode and continuous mode, are accessed here, so the Shooting menu has 19 options spread over 3 screens, and there are 26 options in the Setup menu. Due to the larger LCD screen and restricting the number of on-screen choices to 6, the various options and icons are clear and legible.
|
If you have never used a digital camera before, or you're upgrading from a more basic model, reading the comprehensive and easy-to-follow manual before you start is a must. Thankfully Ricoh have chosen to supply it in printed format, rather than as a PDF on a CD, so you can also carry it with you. The large, wide-angle 3 inch LCD screen is the only way of framing your shots, so if you have to have an optical viewfinder, look elsewhere now. Ricoh have maintained the resolution of the LCD screen on the R10, with an impressive 460,000 pixels on offer, making it one of the best-specced LCDs at this price-point. Consequently the various icons used to represent the camera settings are very clear and legible.
Ricoh are well known for delivering responsive cameras, and the R10 certainly continues that tradition. The start-up time from turning the Ricoh R10 on to being ready to take a photo is very quick at around 0.5 second, and it only takes just over 1 second to zoom from the widest focal length to the longest, impressive given the focal range. Focusing is very quick in good light and the camera happily achieves focus most of the time indoors or in low-light situations. Note that the camera does struggle to lock onto the subject sometimes at the tele-photo end of the lens. The visibility and refresh rate of the new 3 inch LCD screen are very good. It takes about 0.5 second to store a JPEG image, allowing you to keep shooting as they are being recorded onto the memory card - there is no LCD blackout between each image. In the fastest Continuous mode the camera takes 2.5 frames per second for an unlimited number of images at the highest JPEG image quality, which is good for this class of camera. Overall the Ricoh R10 is extremely quick in terms of operational speed.
Once you have captured a photo, the Ricoh R10 has an above average range of options when it comes to playing, reviewing and managing your images. You can instantly scroll through the images that you have taken, view thumbnails (20 onscreen at once), zoom in and out up to 16x magnification, view slideshows with audio, set the print order, delete, trim, rotate, protect and resize an image. There's also a Recover File option which will rescue deleted images, just so long as you don't turn the camera off first. Level Compensation allows you to correct the contrast and tone of an image after it has been taken, and White Balance Compensation the white balance. The Skew Correction function alters any photo that was taken at an angle so it appears as if it were taken directly in front of you. A new feature is the ability to "flag" an image, which essentially allows you to choose up to three files and then immediately display them by pressing the Fn button during playback. Also images are now automatically rotated during playback to fit the current orientation of the camera. The Display button toggles detailed settings information about each picture on and off, such as the ISO rating and aperture / shutter speed, and there is a small histogram available during both shooting and playback. The White Saturation display mode during image playback indicates over-exposed highlights by flashing those areas on and off. When taking a photo, pressing the Display button toggles between the detailed information, the histogram and gridlines to aid composition.
The Ricoh R10 is a subtle evolution of the previous R8 model, with a number of new features that aren't particularly headline-grabbing on their own, but which collectively add up to make this camera even more satisfying to use than before.
|
![]() PhotographyBLOG
is a member of the DIWA
organisation. Our test results for the Ricoh R10 have been submitted to DIWA
for comparison with test results for different samples of
the same camera model supplied by other DIWA
member sites.
PhotographyBLOG
is a member of the DIWA
organisation. Our test results for the Ricoh R10 have been submitted to DIWA
for comparison with test results for different samples of
the same camera model supplied by other DIWA
member sites.